Spaces:
Runtime error

RTMDet: An Empirical Study of Designing Real-Time Object Detectors
RTMDet: An Empirical Study of Designing Real-Time Object Detectors
![]()
![]()
![]()
Abstract
In this paper, we aim to design an efficient real-time object detector that exceeds the YOLO series and is easily extensible for many object recognition tasks such as instance segmentation and rotated object detection. To obtain a more efficient model architecture, we explore an architecture that has compatible capacities in the backbone and neck, constructed by a basic building block that consists of large-kernel depth-wise convolutions. We further introduce soft labels when calculating matching costs in the dynamic label assignment to improve accuracy. Together with better training techniques, the resulting object detector, named RTMDet, achieves 52.8% AP on COCO with 300+ FPS on an NVIDIA 3090 GPU, outperforming the current mainstream industrial detectors. RTMDet achieves the best parameter-accuracy trade-off with tiny/small/medium/large/extra-large model sizes for various application scenarios, and obtains new state-of-the-art performance on real-time instance segmentation and rotated object detection. We hope the experimental results can provide new insights into designing versatile real-time object detectors for many object recognition tasks.

Results and Models
Object Detection
| Model | size | box AP | Params(M) | FLOPS(G) | TRT-FP16-Latency(ms) RTX3090 |
TRT-FP16-Latency(ms) T4 |
Config | Download |
|---|---|---|---|---|---|---|---|---|
| RTMDet-tiny | 640 | 41.1 | 4.8 | 8.1 | 0.98 | 2.34 | config | model | log |
| RTMDet-s | 640 | 44.6 | 8.89 | 14.8 | 1.22 | 2.96 | config | model | log |
| RTMDet-m | 640 | 49.4 | 24.71 | 39.27 | 1.62 | 6.41 | config | model | log |
| RTMDet-l | 640 | 51.5 | 52.3 | 80.23 | 2.44 | 10.32 | config | model | log |
| RTMDet-x | 640 | 52.8 | 94.86 | 141.67 | 3.10 | 18.80 | config | model | log |
Note:
- We implement a fast training version of RTMDet in MMYOLO. Its training speed is 2.6 times faster and memory requirement is lower! Try it here!
- The inference speed of RTMDet is measured with TensorRT 8.4.3, cuDNN 8.2.0, FP16, batch size=1, and without NMS.
- For a fair comparison, the config of bbox postprocessing is changed to be consistent with YOLOv5/6/7 after PR#9494, bringing about 0.1~0.3% AP improvement.
Instance Segmentation
RTMDet-Ins is the state-of-the-art real-time instance segmentation on coco dataset:
![]()
| Model | size | box AP | mask AP | Params(M) | FLOPS(G) | TRT-FP16-Latency(ms) | Config | Download |
|---|---|---|---|---|---|---|---|---|
| RTMDet-Ins-tiny | 640 | 40.5 | 35.4 | 5.6 | 11.8 | 1.70 | config | model | log |
| RTMDet-Ins-s | 640 | 44.0 | 38.7 | 10.18 | 21.5 | 1.93 | config | model | log |
| RTMDet-Ins-m | 640 | 48.8 | 42.1 | 27.58 | 54.13 | 2.69 | config | model | log |
| RTMDet-Ins-l | 640 | 51.2 | 43.7 | 57.37 | 106.56 | 3.68 | config | model | log |
| RTMDet-Ins-x | 640 | 52.4 | 44.6 | 102.7 | 182.7 | 5.31 | config | model | log |
Note:
- The inference speed of RTMDet-Ins is measured on an NVIDIA 3090 GPU with TensorRT 8.4.3, cuDNN 8.2.0, FP16, batch size=1. Top 100 masks are kept and the post process latency is included.
Rotated Object Detection
RTMDet-R achieves state-of-the-art on various remote sensing datasets.
![]()
![]()
![]()
![]()
Models and configs of RTMDet-R are available in MMRotate.
| Backbone | pretrain | Aug | mmAP | mAP50 | mAP75 | Params(M) | FLOPS(G) | TRT-FP16-Latency(ms) | Config | Download |
|---|---|---|---|---|---|---|---|---|---|---|
| RTMDet-tiny | IN | RR | 47.37 | 75.36 | 50.64 | 4.88 | 20.45 | 4.40 | config | model | log |
| RTMDet-tiny | IN | MS+RR | 53.59 | 79.82 | 58.87 | 4.88 | 20.45 | 4.40 | config | model | log |
| RTMDet-s | IN | RR | 48.16 | 76.93 | 50.59 | 8.86 | 37.62 | 4.86 | config | model | log |
| RTMDet-s | IN | MS+RR | 54.43 | 79.98 | 60.07 | 8.86 | 37.62 | 4.86 | config | model | log |
| RTMDet-m | IN | RR | 50.56 | 78.24 | 54.47 | 24.67 | 99.76 | 7.82 | config | model | log |
| RTMDet-m | IN | MS+RR | 55.00 | 80.26 | 61.26 | 24.67 | 99.76 | 7.82 | config | model | log |
| RTMDet-l | IN | RR | 51.01 | 78.85 | 55.21 | 52.27 | 204.21 | 10.82 | config | model | log |
| RTMDet-l | IN | MS+RR | 55.52 | 80.54 | 61.47 | 52.27 | 204.21 | 10.82 | config | model | log |
| RTMDet-l | COCO | MS+RR | 56.74 | 81.33 | 63.45 | 52.27 | 204.21 | 10.82 | config | model | log |
Classification
We also provide the imagenet classification configs of the RTMDet backbone. Find more details in the classification folder.
| Model | resolution | Params(M) | Flops(G) | Top-1 (%) | Top-5 (%) | Download |
|---|---|---|---|---|---|---|
| CSPNeXt-tiny | 224x224 | 2.73 | 0.34 | 69.44 | 89.45 | model |
| CSPNeXt-s | 224x224 | 4.89 | 0.66 | 74.41 | 92.23 | model |
| CSPNeXt-m | 224x224 | 13.05 | 1.93 | 79.27 | 94.79 | model |
| CSPNeXt-l | 224x224 | 27.16 | 4.19 | 81.30 | 95.62 | model |
| CSPNeXt-x | 224x224 | 48.85 | 7.76 | 82.10 | 95.69 | model |
Citation
@misc{lyu2022rtmdet,
      title={RTMDet: An Empirical Study of Designing Real-Time Object Detectors},
      author={Chengqi Lyu and Wenwei Zhang and Haian Huang and Yue Zhou and Yudong Wang and Yanyi Liu and Shilong Zhang and Kai Chen},
      year={2022},
      eprint={2212.07784},
      archivePrefix={arXiv},
      primaryClass={cs.CV}
}
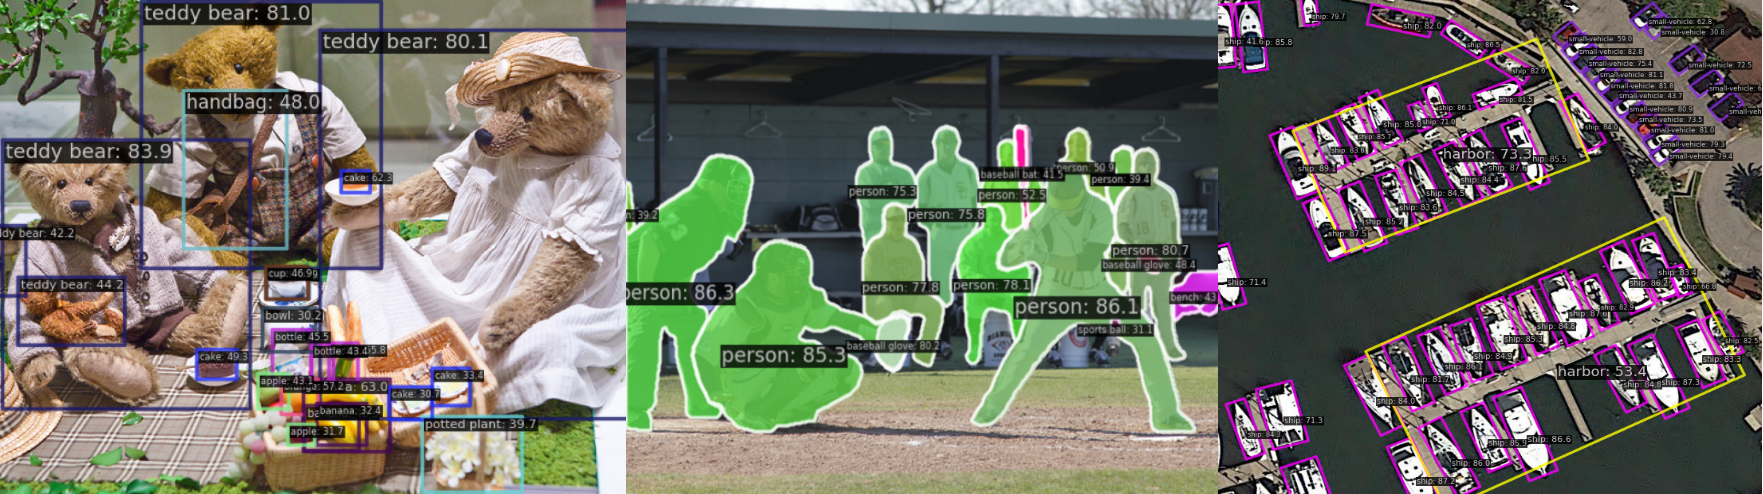
Visualization
Deployment Tutorial
Here is a basic example of deploy RTMDet with MMDeploy-1.x.
Step1. Install MMDeploy
Before starting the deployment, please make sure you install MMDetection-3.x and MMDeploy-1.x correctly.
- Install MMDetection-3.x, please refer to the MMDetection-3.x installation guide.
- Install MMDeploy-1.x, please refer to the MMDeploy-1.x installation guide.
If you want to deploy RTMDet with ONNXRuntime, TensorRT, or other inference engine, please make sure you have installed the corresponding dependencies and MMDeploy precompiled packages.
Step2. Convert Model
After the installation, you can enjoy the model deployment journey starting from converting PyTorch model to backend model by running MMDeploy's tools/deploy.py.
The detailed model conversion tutorial please refer to the MMDeploy document. Here we only give the example of converting RTMDet.
MMDeploy supports converting dynamic and static models. Dynamic models support different input shape, but the inference speed is slower than static models. To achieve the best performance, we suggest converting RTMDet with static setting.
- If you only want to use ONNX, please use
configs/mmdet/detection/detection_onnxruntime_static.pyas the deployment config. - If you want to use TensorRT, please use
configs/mmdet/detection/detection_tensorrt_static-640x640.py.
If you want to customize the settings in the deployment config for your requirements, please refer to MMDeploy config tutorial.
After preparing the deployment config, you can run the tools/deploy.py script to convert your model.
Here we take converting RTMDet-s to TensorRT as an example:
# go to the mmdeploy folder
cd ${PATH_TO_MMDEPLOY}

# download RTMDet-s checkpoint
wget -P checkpoint https://download.openmmlab.com/mmdetection/v3.0/rtmdet/rtmdet_s_8xb32-300e_coco/rtmdet_s_8xb32-300e_coco_20220905_161602-387a891e.pth

# run the command to start model conversion
python tools/deploy.py \
  configs/mmdet/detection/detection_tensorrt_static-640x640.py \
  ${PATH_TO_MMDET}/configs/rtmdet/rtmdet_s_8xb32-300e_coco.py \
  checkpoint/rtmdet_s_8xb32-300e_coco_20220905_161602-387a891e.pth \
  demo/resources/det.jpg \
  --work-dir ./work_dirs/rtmdet \
  --device cuda:0 \
  --show
If the script runs successfully, you will see the following files:
|----work_dirs
     |----rtmdet
          |----end2end.onnx  # ONNX model
          |----end2end.engine  # TensorRT engine file
After this, you can check the inference results with MMDeploy Model Converter API:
from mmdeploy.apis import inference_model

result = inference_model(
  model_cfg='${PATH_TO_MMDET}/configs/rtmdet/rtmdet_s_8xb32-300e_coco.py',
  deploy_cfg='${PATH_TO_MMDEPLOY}/configs/mmdet/detection/detection_tensorrt_static-640x640.py',
  backend_files=['work_dirs/rtmdet/end2end.engine'],
  img='demo/resources/det.jpg',
  device='cuda:0')
Advanced Setting
To convert the model with TRT-FP16, you can enable the fp16 mode in your deploy config:
# in MMDeploy config
backend_config = dict(
    type='tensorrt',
    common_config=dict(
        fp16_mode=True  # enable fp16
    ))
To reduce the end to end inference speed with the inference engine, we suggest you to adjust the post-processing setting of the model. We set a very low score threshold during training and testing to achieve better COCO mAP. However, in actual usage scenarios, a relatively high score threshold (e.g. 0.3) is usually used.
You can adjust the score threshold and the number of detection boxes in your model config according to the actual usage to reduce the time-consuming of post-processing.
# in MMDetection config
model = dict(
    test_cfg=dict(
        nms_pre=1000,  # keep top-k score bboxes before nms
        min_bbox_size=0,
        score_thr=0.3,  # score threshold to filter bboxes
        nms=dict(type='nms', iou_threshold=0.65),
        max_per_img=100)  # only keep top-100 as the final results.
)
Step3. Inference with SDK
We provide both Python and C++ inference API with MMDeploy SDK.
To use SDK, you need to dump the required info during converting the model. Just add --dump-info to the model conversion command:
python tools/deploy.py \
  configs/mmdet/detection/detection_tensorrt_static-640x640.py \
  ${PATH_TO_MMDET}/configs/rtmdet/rtmdet_s_8xb32-300e_coco.py \
  checkpoint/rtmdet_s_8xb32-300e_coco_20220905_161602-387a891e.pth \
  demo/resources/det.jpg \
  --work-dir ./work_dirs/rtmdet-sdk \
  --device cuda:0 \
  --show \
  --dump-info  # dump sdk info
After running the command, it will dump 3 json files additionally for the SDK:
|----work_dirs
     |----rtmdet-sdk
          |----end2end.onnx  # ONNX model
          |----end2end.engine  # TensorRT engine file
          # json files for the SDK
          |----pipeline.json
          |----deploy.json
          |----detail.json
Python API
Here is a basic example of SDK Python API:
from mmdeploy_python import Detector
import cv2

img = cv2.imread('demo/resources/det.jpg')

# create a detector
detector = Detector(model_path='work_dirs/rtmdet-sdk', device_name='cuda', device_id=0)
# run the inference
bboxes, labels, _ = detector(img)
# Filter the result according to threshold
indices = [i for i in range(len(bboxes))]
for index, bbox, label_id in zip(indices, bboxes, labels):
  [left, top, right, bottom], score = bbox[0:4].astype(int),  bbox[4]
  if score < 0.3:
      continue
  # draw bbox
  cv2.rectangle(img, (left, top), (right, bottom), (0, 255, 0))

cv2.imwrite('output_detection.png', img)
C++ API
Here is a basic example of SDK C++ API:
#include <cstdlib>
#include <opencv2/opencv.hpp>
#include "mmdeploy/detector.hpp"

int main() {
  const char* device_name = "cuda";
  int device_id = 0;
  std::string model_path = "work_dirs/rtmdet-sdk";
  std::string image_path = "demo/resources/det.jpg";

  // 1. load model
  mmdeploy::Model model(model_path);
  // 2. create predictor
  mmdeploy::Detector detector(model, mmdeploy::Device{device_name, device_id});
  // 3. read image
  cv::Mat img = cv::imread(image_path);
  // 4. inference
  auto dets = detector.Apply(img);
  // 5. deal with the result. Here we choose to visualize it
  for (int i = 0; i < dets.size(); ++i) {
    const auto& box = dets[i].bbox;
    fprintf(stdout, "box %d, left=%.2f, top=%.2f, right=%.2f, bottom=%.2f, label=%d, score=%.4f\n",
            i, box.left, box.top, box.right, box.bottom, dets[i].label_id, dets[i].score);
    if (bboxes[i].score < 0.3) {
      continue;
    }
    cv::rectangle(img, cv::Point{(int)box.left, (int)box.top},
                  cv::Point{(int)box.right, (int)box.bottom}, cv::Scalar{0, 255, 0});
  }
  cv::imwrite("output_detection.png", img);
  return 0;
}
To build C++ example, please add MMDeploy package in your CMake project as following:
find_package(MMDeploy REQUIRED)
target_link_libraries(${name} PRIVATE mmdeploy ${OpenCV_LIBS})
Other languages
Deploy RTMDet Instance Segmentation Model
We support RTMDet-Ins ONNXRuntime and TensorRT deployment after MMDeploy v1.0.0rc2. And its deployment process is almost consistent with the detection model.
Step1. Install MMDeploy >= v1.0.0rc2
Please refer to the MMDeploy-1.x installation guide to install the latest version. Please remember to replace the pre-built package with the latest version. The v1.0.0rc2 package can be downloaded from v1.0.0rc2 release page.
Step2. Convert Model
This step has no difference with the previous tutorial. The only thing you need to change is switching to the RTMDet-Ins deploy config:
- If you want to use ONNXRuntime, please use
configs/mmdet/instance-seg/instance-seg_rtmdet-ins_onnxruntime_static-640x640.pyas the deployment config. - If you want to use TensorRT, please use
configs/mmdet/instance-seg/instance-seg_rtmdet-ins_tensorrt_static-640x640.py.
Here we take converting RTMDet-Ins-s to TensorRT as an example:
# go to the mmdeploy folder
cd ${PATH_TO_MMDEPLOY}

# download RTMDet-s checkpoint
wget -P checkpoint https://download.openmmlab.com/mmdetection/v3.0/rtmdet/rtmdet-ins_s_8xb32-300e_coco/rtmdet-ins_s_8xb32-300e_coco_20221121_212604-fdc5d7ec.pth

# run the command to start model conversion
python tools/deploy.py \
  configs/mmdet/instance-seg/instance-seg_rtmdet-ins_tensorrt_static-640x640.py \
  ${PATH_TO_MMDET}/configs/rtmdet/rtmdet-ins_s_8xb32-300e_coco.py \
  checkpoint/rtmdet-ins_s_8xb32-300e_coco/rtmdet-ins_s_8xb32-300e_coco_20221121_212604-fdc5d7ec.pth \
  demo/resources/det.jpg \
  --work-dir ./work_dirs/rtmdet-ins \
  --device cuda:0 \
  --show
If the script runs successfully, you will see the following files:
|----work_dirs
     |----rtmdet-ins
          |----end2end.onnx  # ONNX model
          |----end2end.engine  # TensorRT engine file
After this, you can check the inference results with MMDeploy Model Converter API:
from mmdeploy.apis import inference_model

result = inference_model(
  model_cfg='${PATH_TO_MMDET}/configs/rtmdet/rtmdet-ins_s_8xb32-300e_coco.py',
  deploy_cfg='${PATH_TO_MMDEPLOY}/configs/mmdet/instance-seg/instance-seg_rtmdet-ins_tensorrt_static-640x640.py',
  backend_files=['work_dirs/rtmdet-ins/end2end.engine'],
  img='demo/resources/det.jpg',
  device='cuda:0')