
full_name
stringlengths 10
67
| url
stringlengths 29
86
| description
stringlengths 3
347
⌀ | readme
stringlengths 0
162k
| stars
int64 10
3.1k
| forks
int64 0
1.51k
|
|---|---|---|---|---|---|
psyai-net/EmoTalk_release | https://github.com/psyai-net/EmoTalk_release | This is the official source for our ICCV 2023 paper "EmoTalk: Speech-Driven Emotional Disentanglement for 3D Face Animation" | 
# EmoTalk: Speech-Driven Emotional Disentanglement for 3D Face Animation [ICCV2023]
Official PyTorch implementation for the paper:
> **EmoTalk: Speech-Driven Emotional Disentanglement for 3D Face Animation**, ***ICCV 2023***.
>
> Ziqiao Peng, Haoyu Wu, Zhenbo Song, Hao Xu, Xiangyu Zhu, Hongyan Liu, Jun He, Zhaoxin Fan
>
> <a href='https://arxiv.org/abs/2303.11089'><img src='https://img.shields.io/badge/arXiv-2303.11089-red'></a> <a href='https://ziqiaopeng.github.io/emotalk/'><img src='https://img.shields.io/badge/Project-Video-Green'></a> [](LICENSE)
<p align="center">
<img src="./media/emotalk.png" width="90%" />
</p>
> Given audio input expressing different emotions, EmoTalk produces realistic 3D facial animation sequences with corresponding emotional expressions as outputs.
## Environment
- Linux
- Python 3.8.8
- Pytorch 1.12.1
- CUDA 11.3
- Blender 3.4.1
- ffmpeg 4.4.1
Clone the repo:
```bash
git clone https://github.com/psyai-net/EmoTalk_release.git
cd EmoTalk_release
```
Create conda environment:
```bash
conda create -n emotalk python=3.8.8
conda activate emotalk
pip install torch==1.12.1+cu113 torchvision==0.13.1+cu113 torchaudio==0.12.1 --extra-index-url https://download.pytorch.org/whl/cu113
pip install -r requirements.txt
```
## **Demo**
Download Blender and put it in this directory.
```bash
wget https://mirror.freedif.org/blender/release/Blender3.4/blender-3.4.1-linux-x64.tar.xz
tar -xf blender-3.4.1-linux-x64.tar.xz
mv blender-3.4.1-linux-x64 blender && rm blender-3.4.1-linux-x64.tar.xz
```
Download the pretrained models from [EmoTalk.pth](https://drive.google.com/file/d/1gMWRI-w4NJlvWuprvlUUpdkt6Givy_em/view?usp=drive_link) . Put the pretrained models under `pretrain_model` folder.
Put the audio under `aduio` folder and run
```bash
python demo.py --wav_path "./audio/disgust.wav"
```
The generated animation will be saved in `result` folder.
## **Dataset**
Coming soon...
## **Citation**
If you find this work useful for your research, please cite our paper:
```
@inproceedings{peng2023emotalk,
title={EmoTalk: Speech-Driven Emotional Disentanglement for 3D Face Animation},
author={Ziqiao Peng and Haoyu Wu and Zhenbo Song and Hao Xu and Xiangyu Zhu and Hongyan Liu and Jun He and Zhaoxin Fan},
journal={arXiv preprint arXiv:2303.11089},
year={2023}
}
```
## **Acknowledgement**
Here are some great resources we benefit:
- [Faceformer](https://github.com/EvelynFan/FaceFormer) for training pipeline
- [EVP](https://github.com/jixinya/EVP) for training dataloader
- [Speech-driven-expressions](https://github.com/YoungSeng/Speech-driven-expressions) for rendering
- [Wav2Vec2 Content](https://huggingface.co./jonatasgrosman/wav2vec2-large-xlsr-53-english) and [Wav2Vec2 Emotion](https://huggingface.co./r-f/wav2vec-english-speech-emotion-recognition) for audio encoder
- [Head Template](http://filmicworlds.com/blog/solving-face-scans-for-arkit/) for visualization.
Thanks to John Hable for sharing his head template under the CC0 license, which is very helpful for us to visualize the results.
## **Contact**
For research purpose, please contact [email protected]
For commercial licensing, please contact [email protected]
## **License**
This project is licensed under the Creative Commons Attribution-NonCommercial 4.0 International License. Please read the [LICENSE](LICENSE) file for more information.
## **Invitation**
We invite you to join [Psyche AI Inc](https://www.psyai.com/home) to conduct cutting-edge research and business implementation together. At Psyche AI Inc, we are committed to pushing the boundaries of what's possible in the fields of artificial intelligence and computer vision, especially their applications in avatars. As a member of our team, you will have the opportunity to collaborate with talented individuals, innovate new ideas, and contribute to projects that have a real-world impact.
If you are passionate about working on the forefront of technology and making a difference, we would love to hear from you. Please visit our website at [Psyche AI Inc](https://www.psyai.com/home) to learn more about us and to apply for open positions. You can also contact us by [email protected].
Let's shape the future together!!
| 64 | 7 |
shadowaxe99/sprotsagent | https://github.com/shadowaxe99/sprotsagent | null | # SprotsAgent: The Python-based Sports Agent Script
Welcome to SprotsAgent, the Python-based sports agent script that's so good, it might just replace real sports agents (just kidding, we love you, sports agents). This script acts as a virtual sports agent, automating tasks related to player management, contract negotiation, performance tracking, and communication via email and text messaging. It's also a social butterfly, networking on LinkedIn and issuing media comments. The goal? To streamline and automate various tasks typically performed by a sports agent, and to do it with a bit of Pythonic flair.
## Technologies
- Python: Because who doesn't love a snake named after a comedy group?
- Flask or Django: Because we like our web frameworks like we like our coffee - full-bodied and with a kick.
- HTML, CSS, and JavaScript: The holy trinity of frontend development.
- SQLite or PostgreSQL: Because data needs a home too.
- Email integration using SMTP libraries (e.g., smtplib): Because carrier pigeons are so last millennium.
- Text messaging integration using SMS gateway providers (e.g., Twilio): Because who has time for phone calls?
- LinkedIn integration using the LinkedIn API and Python libraries (e.g., python-linkedin): Because networking is not just for computers.
## Features
### Player Information Management
- Store and manage player profiles, including personal details, team affiliations, and performance history. It's like a Rolodex, but better.
- Add, update, and delete player information. Because change is the only constant.
- Retrieve player information based on various criteria (e.g., name, sport, team). It's like Google, but for your players.
### Contract Negotiation Support
- Generate contract templates for different sports and contract types. Because one size doesn't fit all.
- Customize contract terms (e.g., salary, contract duration) based on player and team requirements. Because negotiation is an art.
- Calculate contract-related metrics, such as salary cap impact and contract value. Because math is hard.
### Performance Tracking
- Track and store player performance data, including statistics, game logs, and achievements. Because numbers don't lie.
- Analyze and visualize performance data to assess player progress and identify trends. Because a picture is worth a thousand words.
### Communication
- Integration with email services to send and receive emails related to player contracts, negotiations, and general communication. Because communication is key.
- Integration with SMS services to send text messages to players, teams, or other stakeholders. Because sometimes, you just need to send a text.
### Social Media Networking (LinkedIn)
- Integration with the LinkedIn API to facilitate networking and communication with relevant industry professionals. Because it's not what you know, it's who you know.
- Retrieve and update player profiles on LinkedIn. Because keeping up appearances is important.
- Send messages and establish connections with other LinkedIn users. Because sliding into DMs isn't just for Instagram.
## Contributing
We're on the lookout for contributors who can help us improve and expand this project. If you're a developer with a sense of humor, a sports enthusiast who can code, or just someone who wants to help out, we'd love to have you on board. Together, we can make a difference and help to stop wannabe power broker middlemen (you know who you are).
## Powered by
GPT-3.5-turbo: Because we're living in the future.
## License
[MIT](https://choosealicense.com/licenses/mit/): Because sharing is caring. | 19 | 1 |
ambition85/daylight-protocol | https://github.com/ambition85/daylight-protocol | null | # daylight-protocol
<h1 align="center">Welcome to Daylight Protocol👋</h1>
<p>
<img alt="Version" src="https://img.shields.io/badge/version-0.0.2-blue.svg?cacheSeconds=2592000" />
</p>
> </a>
### 🏠 [Homepage]
## Install
```sh
npm i
```
## How to run the code
```sh
npm start
```
## Architecture
🎥 **FrontEnd**
- React.js
💻 **BackEnd**
- Blockhain
### [Deployment]
- We use Cloud Build to Build and Deploy to AppEngine which is located behind an HTTPS Load Balancer for SSL
- Dev and Production have their own "Service" in AppEngine
- Always Commit to bracn "Dev" first, and when ready to submit to prod please submit a Pull Request from Dev to Master and get at a minimum 1 approval from the team.
- When submitting for approval provide the link to Dev Branch
## Show your support
Give a ⭐️ if this project helped you!
| 10 | 0 |
waterdipai/datachecks | https://github.com/waterdipai/datachecks | Open Source Data Quality Monitoring. | <p align="center">
<img alt="Logo" src="docs/assets/datachecks_banner_logo.svg" width="1512">
</p>
<p align="center"><b>Open Source Data Quality Monitoring.</b></p>
<p align="center">
<img align="center" alt="License" src="https://img.shields.io/badge/License-Apache%202.0-blue.svg"/>
<img align="center" src="https://img.shields.io/pypi/pyversions/datachecks"/>
<img align="center" alt="Versions" src="https://img.shields.io/pypi/v/datachecks"/>
<img align="center" alt="coverage" src="https://static.pepy.tech/personalized-badge/datachecks?period=total&units=international_system&left_color=black&right_color=green&left_text=Downloads"/>
<img align="center" alt="coverage" src="https://codecov.io/gh/waterdipai/datachecks/branch/main/graph/badge.svg?token=cn6lkDRXpl">
<img align="center" alt="Status" src="https://github.com/waterdipai/datachecks/actions/workflows/ci.yml/badge.svg?branch=main"/>
</p>
## What is `datachecks`?
Datachecks is an open-source data monitoring tool that helps to monitor the data quality of databases and data pipelines.
It identifies potential issues, including in the databases and data pipelines. It helps to identify the root cause of the data quality issues and helps to improve the data quality.
Datachecks can generate several metrics, including row count, missing values, invalid values etc. from multiple data sources. Below are the list of supported data sources and metrics.
## Why Data Monitoring?
APM (Application Performance Monitoring) tools are used to monitor the performance of applications. AMP tools are mandatory part of dev stack. Without AMP tools, it is very difficult to monitor the performance of applications.
<p align="center">
<img alt="why_data_observability" src="docs/assets/datachecks_why_data_observability.svg" width="800">
</p>
But for Data products regular APM tools are not enough. We need a new kind of tools that can monitor the performance of Data applications.
Data monitoring tools are used to monitor the data quality of databases and data pipelines. It identifies potential issues, including in the databases and data pipelines. It helps to identify the root cause of the data quality issues and helps to improve the data quality.
## Architecture
<p align="center">
<img alt="datacheck_architecture" src="docs/assets/data_check_architecture.svg" width="800">
</p>
## What Datacheck does not do?
<p align="middle">
<img alt="" src="docs/assets/datachecks_does_not_do.svg" width="800"/>
</p>
## Metric Types
| Metric | Description |
|----------------------------------|------------------------------------------------------------------------------------------------------------------|
| **Reliability Metrics** | Reliability metrics detect whether tables/indices/collections are updating with timely data |
| **Numeric Distribution Metrics** | Numeric Distribution metrics detect changes in the numeric distributions i.e. of values, variance, skew and more |
| **Uniqueness Metrics** | Uniqueness metrics detect when data constraints are breached like duplicates, number of distinct values etc |
| **Completeness Metrics** | Completeness metrics detect when there are missing values in datasets i.e. Null, empty value |
| **Validity Metrics** | Validity metrics detect whether data is formatted correctly and represents a valid value |
## Getting Started
Install `datachecks` with the command that is specific to the database.
### Install Datachecks
To install all datachecks dependencies, use the below command.
```shell
pip install datachecks -U
```
### Postgres
To install only postgres data source, use the below command.
```shell
pip install datachecks 'datachecks[postgres]' -U
```
### OpenSearch
To install only opensearch data source, use the below command.
```shell
pip install datachecks 'datachecks[opensearch]' -U
```
## Running Datachecks
Datachecks can be run using the command line interface. The command line interface takes the config file as input. The config file contains the data sources and the metrics to be monitored.
```shell
datachecks inspect -C config.yaml
```
## Datachecks Configuration File
### Data Source Configuration
Declare the data sources in the `data_sources` section of the config file.
The data sources can be of type `postgres` or `opensearch`.
### Environment Variables in Config File
The configuration file can also use environment variables for the connection parameters. To use environment variables in the config file, use the `!ENV` tag in the config file like `!ENV ${PG_USER}`
### Example Data Source Configuration
```yaml
data_sources:
- name: content_datasource # Name of the data source
type: postgres # Type of the data source
connection: # Connection details of the data source
host: 127.0.0.1 # Host of the data source
port: 5431 # Port of the data source
username: !ENV ${PG_USER} # Username of the data source
password: !ENV ${OS_PASS} # Password of the data source
database: postgres # Database name of the data source
```
### Metric Configuration
Metrics are defined in the `metrics` section of the config file.
```yaml
metrics:
content_datasource: # Reference of the data source for which the metric is defined
count_content_hat: # Name of the metric
metric_type: row_count # Type of the metric
table: example_table # Table name to check for row count
filter: # Optional Filter to apply on the table before applying the metric
where_clause: "category = 'HAT' AND is_valid is True"
```
## Supported Data Sources
Datachecks supports sql and search data sources. Below are the list of supported data sources.
### PostgreSQL
Postgresql data source can be defined as below in the config file.
```yaml
data_sources:
- name: content_datasource # Name of the data source
type: postgres # Type of the data source
connection: # Connection details of the data source
host: # Host of the data source
port: # Port of the data source
username: # Username of the data source
password: # Password of the data source
database: # Database name of the data source
schema: # Schema name of the data source
```
### OpenSearch
OpenSearch data source can be defined as below in the config file.
```yaml
data_sources:
- name: content_datasource # Name of the data source
type: opensearch # Type of the data source
connection: # Connection details of the data source
host: # Host of the data source
port: # Port of the data source
username: # Username of the data source
password: # Password of the data source
```
### [Work In Progress] Data Source Integrations
- **MySql**
- **MongoDB**
- **Elasticsearch**
- **GCP BigQuery**
- **AWS RedShift**
## Supported Metrics
### Reliability Metrics
Reliability metrics detect whether tables/indices/collections are updating with timely data and whether the data is being updated at the expected volume.
| Metric | Description |
|------------------|----------------------------------------------------------------------------------------------------------------------------------------------------------------------------------------------------------------------------------------------------------------------------|
| `row_count` | The number of rows in a table. |
| `document_count` | The number of documents in a document db or search index |
| `freshness` | Data freshness, sometimes referred to as data timeliness, is the frequency in which data is updated for consumption. It is an important data quality dimension and a pillar of data observability because recently refreshed data is more accurate, and thus more valuable |
#### How to define freshness in datachecks config file?
For SQL data sources, the freshness metric can be defined as below.
```yaml
<Datasource name>:
last_updated_row <Metrics name>:
metric_type: freshness # Type of metric is FRESHNESS
table: category_tabel # Table name to check for freshness check if datasource is sql type
field: last_updated # Field name to check for freshness check, this field should be a timestamp field
```
For Search data sources, the freshness metric can be defined as below.
```yaml
<Datasource name>:
last_updated_doc <Metrics name>:
metric_type: freshness # Type of metric is FRESHNESS
index: category_index # Index name to check for freshness check if datasource is search index type
field: last_updated # Field name to check for freshness check, this field should be a timestamp field
```
### Numeric Distribution Metrics
By using a numeric metric to perform basic calculations on your data, you can more easily assess trends.
| Metric | Description |
|------------------|----------------------------------------------------------|
| `row_count` | The number of rows in a table. |
| `document_count` | The number of documents in a document db or search index |
| `max` | Maximum value of a numeric column |
| `min` | Minimum value of a numeric column |
| `average` | Average value of a numeric column |
| `variance` | The statistical variance of the column. |
| `skew` | The statistical skew of the column |
| `kurtosis` | The statistical kurtosis of the column |
| `sum` | The sum of the values in the column |
| `percentile` | The statistical percentile of the column |
| `geometric_mean` | The statistical median of the column |
| `harmonic_mean` | The statistical harmonic mean of the column |
#### How to define numeric metrics in datachecks config file?
For SQL data sources, the numeric metric can be defined as below.
```yaml
<Datasource name>:
<Metrics name>:
metric_type: <Metric type> # Type of NUMERIC metric
table: <Table name> # Table name to check for numeric metric
field: <Field name> # Field name to check for numeric metric
filter: # Optional Filter to apply on the table
where_clause: <Where clause> # SQL Where clause to filter the data before applying the metric
```
For Search data sources, the numeric metric can be defined as below.
```yaml
<Datasource name>:
<Metrics name>:
metric_type: <Metric type> # Type of NUMERIC metric
index: <Index name> # Index name to check for numeric metric
field: <Field name> # Field name to check for numeric metric
filter: # Optional Filter to apply on the index
search_query: <Search Query> # Search Query to filter the data before applying the metric
```
### Completeness Metrics
Completeness metrics detect when there are missing values in datasets.
| Metric | Description |
|---------------------------|--------------------------------------------------------------------------------------|
| `null_count` | The count of rows with a null value in the column. |
| `null_percentage` | The percentage of rows with a null value in the column |
| `empty_string` | The count of rows with a 0-length string (i.e. "") as the value for the column. |
| `empty_string_percentage` | The percentage of rows with a 0-length string (i.e. "") as the value for the column. |
### Uniqueness Metrics
Uniqueness metrics detect when schema and data constraints are breached.
| Metric | Description |
|-------------------|--------------------------------------------------------------------------------------------------------------------------|
| `distinct_count` | The count of distinct elements in the column. This metric should be used when you expect a fixed number of value options |
| `duplicate_count` | The count of rows with the same value for a particular column. | | 30 | 4 |
phoenixframework/dns_cluster | https://github.com/phoenixframework/dns_cluster | Simple DNS clustering for distributed Elixir nodes | # DNSCluster
Simple DNS clustering for distributed Elixir nodes.
## Installation
The package can be installed by adding `dns_cluster` to your list of dependencies in `mix.exs`:
```elixir
def deps do
[
{:dns_cluster, "~> 0.1.0"}
]
end
```
Next, you can configure and start the cluster by adding it to your supervision
tree in your `application.ex`:
```elixir
children = [
{Phoenix.PubSub, ...},
{DNSCluster, query: Application.get_env(:my_app, :dns_cluster_query) || :ignore},
MyAppWeb.Endpoint
]
```
If you are deploying with Elixir releases, the release must be set to support longnames and
the node must be named. These can be set in your `rel/env.sh.eex` file:
```sh
#!/bin/sh
export RELEASE_DISTRIBUTION=name
export RELEASE_NODE="myapp@fully-qualified-host-or-ip"
```
| 46 | 1 |
Antoinegtir/instagram-threads | https://github.com/Antoinegtir/instagram-threads | Fully functional clone of Threads | # Threads.
<img height="300" src="client/assets/banner.png"></img>
## Description:
The project aims to clone the Threads from Instagram social network in order to understand how this type of application could work, using Flutter framework & Firebase Database.
This repository is use for educationnal content.
## 🚧 The project if not finished.
The project is under construction, activly developed, `feel free to star the project` if you want to support me and be notify to the major update of the construction of this social network. This just the begining be patient!
## 💡 Idea
if you want to see in realtime the progression of the evolution of project, follow the link: https://github.com/users/Antoinegtir/projects/6
## 🔗 Link of my article about the implemtation
<a href="https://medium.com/@zkhwctb/how-i-created-an-open-source-threads-clone-with-flutter-bddc7b6ebc55">
<img src="https://img.shields.io/badge/medium-fff?style=for-the-badge&logo=medium&logoColor=black" alt="Medium">
</a>
## Screenshots
Follow Page | Privacy Page | Threads Page | Feed Page
:-------------------------:|:-------------------------:|:-------------------------:|:-------------------------:
||||
Profile Page | Search Page | Notification Page | Edit Page
:-------------------------:|:-------------------------:|:-------------------------:|:-------------------------:
||||
Settings Page | Post Page | Crop Page | Camera Page
:-------------------------:|:-------------------------:|:-------------------------:|:-------------------------:
||||
## Language & Tools used:
<img src="https://skillicons.dev/icons?i=flutter,dart,firebase"/>
## Aivailable on:
iOS, MacOS, Android, Web.
## Usage
- install flutter engine -> https://docs.flutter.dev/get-started/install
- tap command `flutter run` in the root folder of the project
## Author
@Antoinegtir
| 76 | 5 |
Minibattle/WinDeckOS | https://github.com/Minibattle/WinDeckOS | Simplifying Windows on Steam Deck with a custom image that makes it feel much more like steamOS and includes many ease of use additions. | # WinDeckOS [Version 1.1]
Simplifying Windows on Steam Deck with a custom image that makes it feel much more like steamOS and includes many ease of use additions.
#
Some of the most noteable changes are:
1. All steam deck drivers come pre-installed
2. It starts with the same UI steamOS uses, so you can keep the console like experience and still get the better compatibility windows brings. Best of both worlds.
3. Sleep mode is fully working here
4. The WiFi driver is greatly improved due to the usage of the [RTKiller driver](https://github.com/ryanrudolfoba/SteamDeckWindowsFixForWiFi)
5. A whole bunch of other quality of life stuff, a full list can be found [here](https://drive.google.com/file/d/1fPM4LSM65I5WNBEaw7nCKSlL4Tl3zcg4/view?usp=drive_link)
# Video Tutorial
[A video showcasing how to install WinDeckOS can be found here:](https://youtu.be/MZkqbHMyqsI) and if that video is taken down, [then you can find it here](https://drive.google.com/file/d/1rKiU0uRroSsQrylyUChOw32mEfZ6DDlP/view?usp=sharing)
#
And if neither of those work, [this one should](https://vimeo.com/844086829)
## Links mentioned in the video guide
- [Media Creation tool](https://go.microsoft.com/fwlink/?linkid=2156295)
- [MacriumRescueISO and WinDeckOS download](https://pixeldrain.com/u/pMvKgY7F)
- [Rufus](https://github.com/pbatard/rufus/releases/download/v4.1/rufus-4.1.exe)
### Alternative Download Links
- [MacriumRescueISO Alternate link](https://mega.nz/file/xvkxxKKI#tsEXHTpIX7ZUx9xDvh73mfA_HRsE8CI3XBWzmvGY1ZI)
- [WinDeckOS Alternate Link](https://mega.nz/file/QqdV1Dob#wWDaDDJnLDR5BjmpLbQS3K2TXA_d2DAw9QI52yAp1bo)
- [MacriumRescueISO Google Drive Link](https://drive.google.com/file/d/1n7WgFMYcTdNSrqaJQW_xnqlQtnmZSM-9/view?usp=sharing)
- [WinDeckOS Google Drive Link](https://drive.google.com/file/d/16ohIRz1HAWFYw96h0gfDETL4LuRRLhrf/view?usp=sharing)
- [WinDeckOS Patch Notes](https://drive.google.com/file/d/1fPM4LSM65I5WNBEaw7nCKSlL4Tl3zcg4/view?usp=drive_link)
#
And [here's an alternative link that should be working for everyone that contains the MacriumRescueISO and the WinDeckOS image file.](https://gofile.io/d/VDov5a)
Using Gofile so it may be taken down after some time.
# Written Guide
This is a written guide explaining how to install WinDeckOS using an external Windows PC.
## Requirements
1. An external PC running Windows
2. Some kind of external storage device with at least 12GB of usuable storage and a way to connect it to your Steam Deck
3. A Steam Deck (or maybe some other device you want to try downloading this too)
It is recommended that the external storage device contains at least 16GB, although technically, as long as there is 12GB of usuable memory, this should work.
This should work on an SD card, although I haven't tested that personally so I can't confirm anything.
This will completely wipe your steam deck, so be sure to back up any files, such as saves, you wish too keep. Not every steam game supports cloud saves so keep that in mind before continuing.
# Step One: Formatting the Deck's Drive
You can skip to step 2 if you already have windows installed, or if the drive your using is already completely wiped
#
### Media Creation Tool
Download the Media Creation tool for windows [here.](https://go.microsoft.com/fwlink/?linkid=2156295) Once it's finished downloading, run it, and make sure your external storage device is connected.
Accept the windows license agreement and when asked about language and edition, choose whatever you want and click next. When asked which media to use - enseure you click "USB flash drive", then click next. Select the external drive your using for setup, then click next.
The installer will tell you that your device is ready and you can now safely close it and insert the drive into your Steam Deck.
### Booting the external drive
Ensure your external drive is connected to your Steam Deck and then hold down the volume down key and press the power button one time. Your deck will beep and then it should boot into the Bios. From here, select whatever external drive your using for setup and it should
boot the windows installer in vertical mode.
### Formatting the drive from the windows installer
The trackpad is still controlled as if the screen was horizontal so navigation can be a bit tricky, but the touch screen does work if you'd prefer to use that. On the first screen that shows up, click on next and then install now. When asked about a product key, select
"I don't have a product key". It doesn't matter what version of windows you select, so just click next (Your version of windows will be the same regardless of your choice here). Accept the license agreement and then select next.
#
(If you have an SD card inserted that you don't want too wipe, then you should remove it before doing this part, unless you used an SD card to create windows installation media)
#
When asked whether to "Upgrade Install" or "Custom Install" ensure you select "Custom install". You will then be greeted with a screen full of drives and partitions. Manually go through and select each drive then click delete, then format the remaining ones it lets you.
After doing this, your steam deck will no longer boot. Once your done, you may hold down the power button on your steam deck to shut it off.
# Step Two: Preparing the drive for installation on the Deck
Make sure your external drive is connected, and start downloading the [MacriumRescue ISO and the WinDeckOS disk image](https://pixeldrain.com/u/pMvKgY7F)
#
While those are downloading, download this program called [Rufus,](https://github.com/pbatard/rufus/releases/download/v4.1/rufus-4.1.exe) and run it. On the auto update box, you can select "no". In the rufus UI, select the external drive your using.
If your drive isn't showing up, you may need to select "Show advanced hard drive properties" and check the box titled "list USB Hard Drives". Under the "Boot selection" tab, there's a select button that will let you browse for a file,
in this case select the [MacriumRescue ISO](https://pixeldrain.com/u/pMvKgY7F) we downloaded earlier, or just drag and drop the file into Rufus. Make sure the "Partition scheme" is set too GPT
and the "File system" is set too "NTFS". Everything else should remain unchanged. Press "Start" and you will get a popup warning you that the drive will be formated. Press "ok" and wait for it too complete.
#
Once it finishes, open the newley changed drive in file explorer (should be labled "Rescue"), and drag and drop the [WinDeckOS image file](https://pixeldrain.com/u/pMvKgY7F) to the root of the external drive
(This may take awhile). Once it finishes, take out the drive and put it in your Steam Deck.
# Step Three: Installing the image onto the Deck
Ensure your external drive is connected to your Steam Deck then hold the volume down key and press the power button one time. Your Steam Deck should beep and boot into the Bios. from here select the external drive your using for this setup and it will boot the Macrium
Reflect ISO in vertical mode. Select "Browse for an image file..."
#

#
In the "Select an image file" window choose the drive labeled "Rescue"
#

#
Choose the file named WinDeckOS
#

#
Click the first of the three new boxes on screen and a button called "Actions.." will appear
#

#
Afther clicking "Actions..." you'll need too select "Restore this partition..."
#

#
Click on "Select a disk to restore to..." and you'll be met with a bunch of options.
#

#
Choose the drive you wish to install WinDeckOS too (it's recommended you install it to the internall SSD or things like sleep mode may not work). Next, check all 3 of the little boxes from the disk image (you may need to drag the window too make the last box visible)
#

#
Once they're all checked, click "Copy Partitions" then select "Shrink or extend to fill the target disk". If you don't get that prompt, don't worry, it's because you have a 2TB drive and the partitions already fit that.
#

#
If done correctly, every box will have a green outline around it, like this;
#

#
Click "Next" in the bottom right and then click finish (may require you too drag the window for that option to be visible). You'll get a prompt stating that the drive will be formated, check the acknowledgement box then press continue.
From here, WinDeckOS will start installing and once it's finished you can restart your Steam Deck and it should boot into WinDeckOS.
# Step Four: First Time Setup
WinDeckOS may boot in vertical mode, if this is the case, wait for the gamepadUI too show up and once it does swipe 3 fingers down to be taken to the desktop. Click the windows button on the taskbar and head to settings. Then click on display, scroll down too display
orientation, and change it too "Landscape". Close settings and tap the steam icon on the taskbar to open the gamepadUI again proceed with setup, and when you get too Wifi there's two ways to connect.
### Option One: Connecting manually by typing in the network SSID
In the gamepadUI select "Other network..." and type in your internet information. Next, select your WiFi at the top of the list and finally, sign into your steam account and you'll be done with the WinDeckOS setup and ready to go.
### Option Two: Connecting from the desktop
Swipe 3 fingers down to show the desktop, and in the bottom right tap the internet icon located next to the sound and batter icon. In the quick access menu that shows up, tap the arrow next to the WiFi symbol and connect to your internet using the touch screen. After doing so, tap the steam icon and you will need to restart your steam deck, or you won't be able to type on the sign in screen. Simply press the steam button, go down to power, then press "Restart System".
After that proceed through the setup as normal and you will be fully setup with WinDeckOS. Enjoy!
| 59 | 1 |
tumurzakov/AnimateDiff | https://github.com/tumurzakov/AnimateDiff | AnimationDiff with train | # AnimateDiff
<a target="_blank" href="https://colab.research.google.com/github/tumurzakov/AnimateDiff/blob/main/Fine_tune_AnimateDiff.ipynb">
<img src="https://colab.research.google.com/assets/colab-badge.svg" alt="Open In Colab"/>
</a>
This repository is the official implementation of [AnimateDiff](https://arxiv.org/abs/2307.04725).
**[AnimateDiff: Animate Your Personalized Text-to-Image Diffusion Models without Specific Tuning](https://arxiv.org/abs/2307.04725)**
</br>
Yuwei Guo,
Ceyuan Yang*,
Anyi Rao,
Yaohui Wang,
Yu Qiao,
Dahua Lin,
Bo Dai
<p style="font-size: 0.8em; margin-top: -1em">*Corresponding Author</p>
[Arxiv Report](https://arxiv.org/abs/2307.04725) | [Project Page](https://animatediff.github.io/)
## Todo
- [x] Code Release
- [x] Arxiv Report
- [x] GPU Memory Optimization
- [ ] Gradio Interface
## Setup for Inference
### Prepare Environment
~~Our approach takes around 60 GB GPU memory to inference. NVIDIA A100 is recommanded.~~
***We updated our inference code with xformers and a sequential decoding trick. Now AnimateDiff takes only ~12GB VRAM to inference, and run on a single RTX3090 !!***
```
git clone https://github.com/guoyww/AnimateDiff.git
cd AnimateDiff
conda env create -f environment.yaml
conda activate animatediff
```
### Download Base T2I & Motion Module Checkpoints
We provide two versions of our Motion Module, which are trained on stable-diffusion-v1-4 and finetuned on v1-5 seperately.
It's recommanded to try both of them for best results.
```
git lfs install
git clone https://huggingface.co./runwayml/stable-diffusion-v1-5 models/StableDiffusion/
bash download_bashscripts/0-MotionModule.sh
```
You may also directly download the motion module checkpoints from [Google Drive](https://drive.google.com/drive/folders/1EqLC65eR1-W-sGD0Im7fkED6c8GkiNFI?usp=sharing), then put them in `models/Motion_Module/` folder.
### Prepare Personalize T2I
Here we provide inference configs for 6 demo T2I on CivitAI.
You may run the following bash scripts to download these checkpoints.
```
bash download_bashscripts/1-ToonYou.sh
bash download_bashscripts/2-Lyriel.sh
bash download_bashscripts/3-RcnzCartoon.sh
bash download_bashscripts/4-MajicMix.sh
bash download_bashscripts/5-RealisticVision.sh
bash download_bashscripts/6-Tusun.sh
bash download_bashscripts/7-FilmVelvia.sh
bash download_bashscripts/8-GhibliBackground.sh
```
### Inference
After downloading the above peronalized T2I checkpoints, run the following commands to generate animations. The results will automatically be saved to `samples/` folder.
```
python -m scripts.animate --config configs/prompts/1-ToonYou.yaml
python -m scripts.animate --config configs/prompts/2-Lyriel.yaml
python -m scripts.animate --config configs/prompts/3-RcnzCartoon.yaml
python -m scripts.animate --config configs/prompts/4-MajicMix.yaml
python -m scripts.animate --config configs/prompts/5-RealisticVision.yaml
python -m scripts.animate --config configs/prompts/6-Tusun.yaml
python -m scripts.animate --config configs/prompts/7-FilmVelvia.yaml
python -m scripts.animate --config configs/prompts/8-GhibliBackground.yaml
```
## Gallery
Here we demonstrate several best results we found in our experiments or generated by other artists.
<table class="center">
<tr>
<td><img src="__assets__/animations/model_01/01.gif"></td>
<td><img src="__assets__/animations/model_01/02.gif"></td>
<td><img src="__assets__/animations/model_01/03.gif"></td>
<td><img src="__assets__/animations/model_01/04.gif"></td>
</tr>
</table>
<p style="margin-left: 2em; margin-top: -1em">Model:<a href="https://civitai.com/models/30240/toonyou">ToonYou</a></p>
<table>
<tr>
<td><img src="__assets__/animations/model_02/01.gif"></td>
<td><img src="__assets__/animations/model_02/02.gif"></td>
<td><img src="__assets__/animations/model_02/03.gif"></td>
<td><img src="__assets__/animations/model_02/04.gif"></td>
</tr>
</table>
<p style="margin-left: 2em; margin-top: -1em">Model:<a href="https://civitai.com/models/4468/counterfeit-v30">Counterfeit V3.0</a></p>
<table>
<tr>
<td><img src="__assets__/animations/model_03/01.gif"></td>
<td><img src="__assets__/animations/model_03/02.gif"></td>
<td><img src="__assets__/animations/model_03/03.gif"></td>
<td><img src="__assets__/animations/model_03/04.gif"></td>
</tr>
</table>
<p style="margin-left: 2em; margin-top: -1em">Model:<a href="https://civitai.com/models/4201/realistic-vision-v20">Realistic Vision V2.0</a></p>
<table>
<tr>
<td><img src="__assets__/animations/model_04/01.gif"></td>
<td><img src="__assets__/animations/model_04/02.gif"></td>
<td><img src="__assets__/animations/model_04/03.gif"></td>
<td><img src="__assets__/animations/model_04/04.gif"></td>
</tr>
</table>
<p style="margin-left: 2em; margin-top: -1em">Model: <a href="https://civitai.com/models/43331/majicmix-realistic">majicMIX Realistic</a></p>
<table>
<tr>
<td><img src="__assets__/animations/model_05/01.gif"></td>
<td><img src="__assets__/animations/model_05/02.gif"></td>
<td><img src="__assets__/animations/model_05/03.gif"></td>
<td><img src="__assets__/animations/model_05/04.gif"></td>
</tr>
</table>
<p style="margin-left: 2em; margin-top: -1em">Model:<a href="https://civitai.com/models/66347/rcnz-cartoon-3d">RCNZ Cartoon</a></p>
<table>
<tr>
<td><img src="__assets__/animations/model_06/01.gif"></td>
<td><img src="__assets__/animations/model_06/02.gif"></td>
<td><img src="__assets__/animations/model_06/03.gif"></td>
<td><img src="__assets__/animations/model_06/04.gif"></td>
</tr>
</table>
<p style="margin-left: 2em; margin-top: -1em">Model:<a href="https://civitai.com/models/33208/filmgirl-film-grain-lora-and-loha">FilmVelvia</a></p>
## BibTeX
```
@misc{guo2023animatediff,
title={AnimateDiff: Animate Your Personalized Text-to-Image Diffusion Models without Specific Tuning},
author={Yuwei Guo, Ceyuan Yang, Anyi Rao, Yaohui Wang, Yu Qiao, Dahua Lin, Bo Dai},
year={2023},
eprint={2307.04725},
archivePrefix={arXiv},
primaryClass={cs.CV}
}
```
## Contact Us
**Yuwei Guo**: [[email protected]](mailto:[email protected])
**Ceyuan Yang**: [[email protected]](mailto:[email protected])
**Bo Dai**: [[email protected]](mailto:[email protected])
## Acknowledgements
Codebase built upon [Tune-a-Video](https://github.com/showlab/Tune-A-Video).
| 24 | 3 |
bitquark/shortscan | https://github.com/bitquark/shortscan | An IIS short filename enumeration tool | # Shortscan
An IIS short filename enumeration tool.
## Functionality
Shortscan is designed to quickly determine which files with short filenames exist on an IIS webserver. Once a short filename has been identified the tool will try to automatically identify the full filename.
In addition to standard discovery methods Shortscan also uses a unique checksum matching approach to attempt to find the long filename where the short filename is based on Windows' propriatary shortname collision avoidance checksum algorithm (more on this research at a later date).
## Installation
### Quick install
Using a recent version of [go](https://golang.org/):
```
go install github.com/bitquark/shortscan/cmd/shortscan@latest
```
### Manual install
To build (and optionally install) locally:
```
go get && go build
go install
```
## Usage
### Basic usage
Shortscan is easy to use with minimal configuration. Basic usage looks like:
```
$ shortscan http://example.org/
```
### Examples
This example sets multiple custom headers by using `--header`/`-H` multiple times:
```
shortscan -H 'Host: gibson' -H 'Authorization: Basic ZGFkZTpsMzN0'
```
To check whether a site is vulnerable without performing file enumeration use:
```
shortscan --isvuln
```
### Advanced features
The following options allow further tweaks:
```
$ shortscan --help
Shortscan v0.6 · an IIS short filename enumeration tool by bitquark
Usage: main [--wordlist FILE] [--header HEADER] [--concurrency CONCURRENCY] [--timeout SECONDS] [--verbosity VERBOSITY] [--fullurl] [--stabilise] [--patience LEVEL] [--characters CHARACTERS] [--autocomplete mode] [--isvuln] URL
Positional arguments:
URL url to scan
Options:
--wordlist FILE, -w FILE
combined wordlist + rainbow table generated with shortutil
--header HEADER, -H HEADER
header to send with each request (use multiple times for multiple headers)
--concurrency CONCURRENCY, -c CONCURRENCY
number of requests to make at once [default: 20]
--timeout SECONDS, -t SECONDS
per-request timeout in seconds [default: 10]
--verbosity VERBOSITY, -v VERBOSITY
how much noise to make (0 = quiet; 1 = debug; 2 = trace) [default: 0]
--fullurl, -F display the full URL for confirmed files rather than just the filename [default: false]
--stabilise, -s attempt to get coherent autocomplete results from an unstable server (generates more requests) [default: false]
--patience LEVEL, -p LEVEL
patience level when determining vulnerability (0 = patient; 1 = very patient) [default: 0]
--characters CHARACTERS, -C CHARACTERS
filename characters to enumerate [default: JFKGOTMYVHSPCANDXLRWEBQUIZ8549176320-_()&'!#$%@^{}~]
--autocomplete mode, -a mode
autocomplete detection mode (auto = autoselect; method = HTTP method magic; status = HTTP status; distance = Levenshtein distance; none = disable) [default: auto]
--isvuln, -V bail after determining whether the service is vulnerable [default: false]
--help, -h display this help and exit
```
## Utility
The shortscan project includes a utility named `shortutil` which can be used to perform various short filename operations and to make custom rainbow tables for use with the tool.
### Examples
You can create a rainbow table from an existing wordlist like this:
```
shortutil wordlist input.txt > output.rainbow
```
To generate a one-off checksum for a file:
```
shortutil checksum index.html
```
### Usage
Run `shortutil <command> --help` for a definiteive list of options for each command.
```
Shortutil v0.3 · a short filename utility by bitquark
Usage: main <command> [<args>]
Options:
--help, -h display this help and exit
Commands:
wordlist add hashes to a wordlist for use with, for example, shortscan
checksum generate a one-off checksum for the given filename
```
## Wordlist
A custom wordlist was built for shortscan. For full details see [pkg/shortscan/resources/README.md](pkg/shortscan/resources/README.md)
## Credit
Original IIS short filename [research](https://soroush.secproject.com/downloadable/microsoft_iis_tilde_character_vulnerability_feature.pdf) by Soroush Dalili.
Additional research and this project by [bitquark](https://github.com/bitquark).
| 250 | 21 |
Devalphaspace/portfolio_website | https://github.com/Devalphaspace/portfolio_website | null | # Professional-Portfolio-Website
| 34 | 8 |
qi4L/seeyonerExp | https://github.com/qi4L/seeyonerExp | 致远OA利用工具 | # seeyoner
致远OA漏洞利用工具
## Usage
```
PS C:\> seeyonerExp.exe -h
一个简单的致远OA安全测试工具,目的是为了协助漏洞自查、修复工作。
Usage:
Seeyoner [command]
Available Commands:
exploit 漏洞利用
help Help about any command
list 列出所有漏洞信息
scan 漏洞检测
Flags:
-h, --help help for Seeyoner
Use "Seeyoner [command] --help" for more information about a command.
```
### scan
全漏洞探测:
```
seeyonerExp.exe -u http://xxx.com -i 0
```
指定漏洞探测:
`-vn`指定漏洞编号,可通过`-show`参数查看:
```
D:\>seeyonerExp.exe list
漏洞列表:
1、seeyon<8.0_fastjson反序列化
2、thirdpartyController.do管理员session泄露
3、webmail.do任意文件下载(CNVD-2020-62422)
4、ajax.do未授权&任意文件上传
5、getSessionList泄露Session
6、htmlofficeservlet任意文件上传
7、initDataAssess.jsp信息泄露
8、DownExcelBeanServlet信息泄露
9、createMysql.jsp数据库信息泄露
10、test.jsp路径
11、setextno.jsp路径
12、status.jsp路径(状态监控页面)
```
探测seeyon<8.0_fastjson反序列化漏洞:
```
seeyonerExp.exe scan -u http://xxx.com -i 1
```
### run
以Session泄露+zip文件上传解压为例,指定编号为`2`:
```
seeyonerExp.exe exploit -u http://xxxx.com -i 2
```
| 13 | 1 |
shroominic/codeinterpreter-api | https://github.com/shroominic/codeinterpreter-api | Open source implementation of the ChatGPT Code Interpreter 👾 | # Code Interpreter API
A LangChain implementation of the ChatGPT Code Interpreter.
Using CodeBoxes as backend for sandboxed python code execution.
[CodeBox](https://github.com/shroominic/codebox-api/tree/main) is the simplest cloud infrastructure for your LLM Apps.
You can run everything local except the LLM using your own OpenAI API Key.
## Features
- Dataset Analysis, Stock Charting, Image Manipulation, ....
- Internet access and auto Python package installation
- Input `text + files` -> Receive `text + files`
- Conversation Memory: respond based on previous inputs
- Run everything local except the OpenAI API (OpenOrca or others maybe soon)
- Use CodeBox API for easy scaling in production (coming soon)
## Installation
Get your OpenAI API Key [here](https://platform.openai.com/account/api-keys) and install the package.
```bash
pip install "codeinterpreterapi[all]"
```
Everything for local experiments are installed with the `all` extra.
For deployments, you can use `pip install codeinterpreterapi` instead which does not install the additional dependencies.
## Usage
To configure OpenAI and Azure OpenAI, ensure that you set the appropriate environment variables (or use a .env file):
For OpenAI, set the OPENAI_API_KEY environment variable:
```
export OPENAI_API_KEY=your_openai_api_key
```
For Azure OpenAI, set the following environment variables:
```
export OPENAI_API_TYPE=azure
export OPENAI_API_VERSION=your_api_version
export OPENAI_API_BASE=your_api_base
export OPENAI_API_KEY=your_azure_openai_api_key
export DEPLOYMENT_NAME=your_deployment_name
```
Remember to replace the placeholders with your actual API keys and other required information.
```python
from codeinterpreterapi import CodeInterpreterSession
async def main():
# create a session
session = CodeInterpreterSession()
await session.astart()
# generate a response based on user input
response = await session.generate_response(
"Plot the bitcoin chart of 2023 YTD"
)
# output the response (text + image)
print("AI: ", response.content)
for file in response.files:
file.show_image()
# terminate the session
await session.astop()
if __name__ == "__main__":
import asyncio
# run the async function
asyncio.run(main())
```
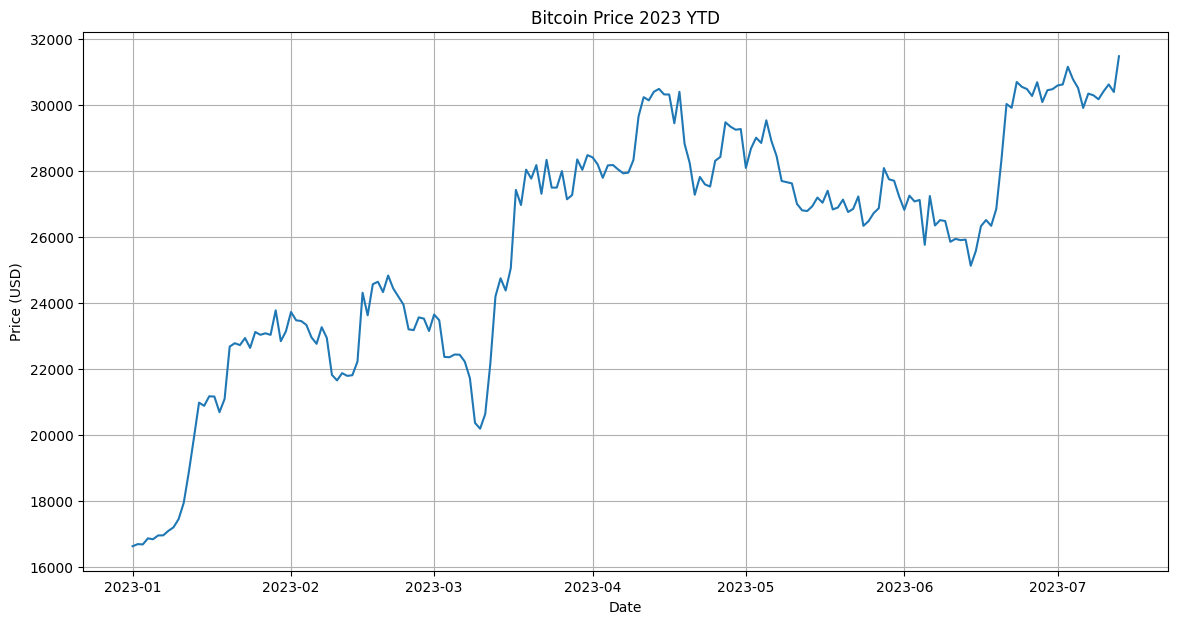
Bitcoin YTD Chart Output
## Dataset Analysis
```python
from codeinterpreterapi import CodeInterpreterSession, File
async def main():
# context manager for auto start/stop of the session
async with CodeInterpreterSession() as session:
# define the user request
user_request = "Analyze this dataset and plot something interesting about it."
files = [
File.from_path("examples/assets/iris.csv"),
]
# generate the response
response = await session.generate_response(
user_request, files=files
)
# output to the user
print("AI: ", response.content)
for file in response.files:
file.show_image()
if __name__ == "__main__":
import asyncio
asyncio.run(main())
```
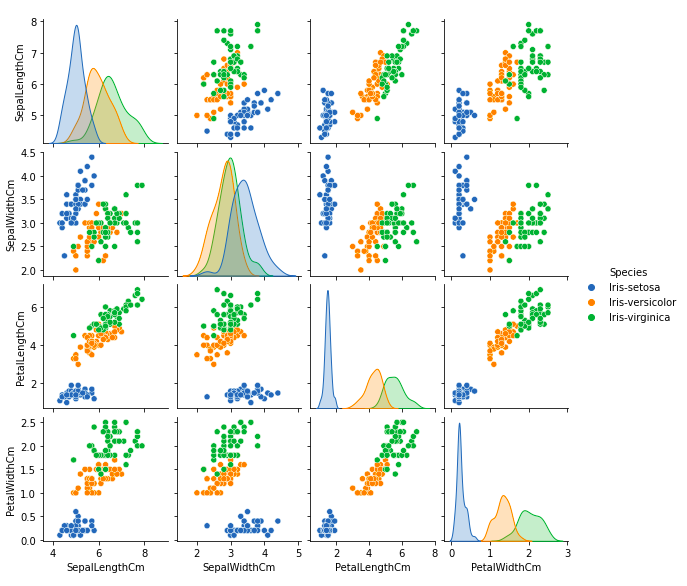
Iris Dataset Analysis Output
## Production
In case you want to deploy to production, you can utilize the CodeBox API for seamless scalability.
Please contact me if you are interested in this, as it is still in the early stages of development.
## Contributing
There are some remaining TODOs in the code.
So, if you want to contribute, feel free to do so.
You can also suggest new features. Code refactoring is also welcome.
Just open an issue or pull request and I will review it.
Please also submit any bugs you find as an issue with a minimal code example or screenshot.
This helps me a lot in improving the code.
Thanks!
## Streamlit WebApp
To start the web application created with streamlit:
```bash
streamlit run frontend/app.py
```
## License
[MIT](https://choosealicense.com/licenses/mit/)
## Contact
You can contact me at [[email protected]](mailto:[email protected]).
But I prefer to use [Twitter](https://twitter.com/shroominic) or [Discord](https://discord.gg/QYzBtq37) DMs.
## Support this project
If you would like to help this project with a donation, you can [click here](https://ko-fi.com/shroominic).
Thanks, this helps a lot! ❤️
## Star History
<a href="https://star-history.com/#shroominic/codeinterpreter-api&Date">
<picture>
<source media="(prefers-color-scheme: dark)" srcset="https://api.star-history.com/svg?repos=shroominic/codeinterpreter-api&type=Date&theme=dark" />
<source media="(prefers-color-scheme: light)" srcset="https://api.star-history.com/svg?repos=shroominic/codeinterpreter-api&type=Date" />
<img alt="Star History Chart" src="https://api.star-history.com/svg?repos=shroominic/codeinterpreter-api&type=Date" />
</picture>
</a>
| 2,376 | 231 |
dwarvesf/go-threads | https://github.com/dwarvesf/go-threads | Unofficial, Reverse-Engineered Golang client for Meta's Threads. Supports Read and Write. | <h1 align="center">
Dwarves Golang Threads API
</h1>
<p align="center">
<a href="https://github.com/dwarvesf">
<img src="https://img.shields.io/badge/-make%20by%20dwarves-%23e13f5e?style=for-the-badge&logo=data:image/png;base64,iVBORw0KGgoAAAANSUhEUgAAACwAAAAsBAMAAADsqkcyAAAAD1BMVEUAAAD///////////////+PQt5oAAAABXRSTlMAQL//gOnhmfMAAAAJcEhZcwAAHsIAAB7CAW7QdT4AAACYSURBVHicndLRDYJAEIThMbGAI1qAYAO6bAGXYP81uSGBk+O/h3Mev4dhWJCkYZqreOi1xoh0eSIvoCaBRjc1B9+I31g9Z2aJ5jkOsYScBW8zDerO/fObnY/FiTl3caOEH2nMzpyZhezIlgqXr2OlOX617Up/nHnPUg0+LHl18YO50d3ghOy1ioeIq1ceTypsjpvYeJohfQEE5WtH+OEYkwAAAABJRU5ErkJggg==&&logoColor=white" alt="Dwarves Foundation" />
</a>
<a href="https://discord.gg/dwarvesv">
<img src="https://img.shields.io/badge/-join%20the%20community-%235865F2?style=for-the-badge&logo=discord&&logoColor=white" alt="Dwarves Foundation Discord" />
</a>
</p>
Unofficial, Reverse-Engineered Golang client for Meta's Threads. Supports Read and Write.
## Getting started
How to install
Install the library with the following command using go module:
```
$ go get github.com/dwarvesf/go-threads
```
Examples
Find examples of how to use the library in the examples folder:
```
ls examples
├── create_post
│ └── main.go
...
```
## API
### Disclaimer
The Threads API is a public API in the library, requiring no authorization. In contrast, the Instagram API, referred to as the private API, requires the Instagram username and password for interaction.
The public API offers read-only endpoints, while the private API provides both read and write endpoints. The private API is generally more stable as Instagram is a reliable product.
Using the public API reduces the risk of rate limits or account suspension. However, there is a trade-off between stability, bugs, rate limits, and suspension. The library allows for combining approaches, such as using the public API for read-only tasks and the private API for write operations. A retry mechanism can also be implemented, attempting the public API first and then falling back to the private API if necessary.
### Initialization
To start using the `GoThreads` package, import the relevant class for communication with the Threads API and create an instance of the object.
For utilizing only the public API, use the following code snippet:
```go
import (
"github.com/dwarvesf/go-threads"
)
func main() {
th := threads.NewThreads()
th.GetThreadLikers(<thread_id>)
// Using global instance
threads.GetThreadLikers(<thread_id>)
}
```
If you intend to use the private API exclusively or both the private and public APIs, utilize the following code snippet:
```go
package main
import (
"fmt"
"github.com/dwarvesf/go-threads"
)
func main() {
cfg, err := threads.InitConfig(
threads.WithDoLogin("instagram_username", "instagram_password"),
)
if err != nil {
fmt.Println("unable init config", err)
return
}
client, err := threads.NewPrivateAPIClient(cfg)
if err != nil {
fmt.Println("unable init API client", err)
return
}
}
```
Or the shorter syntax
```go
package main
import (
"fmt"
"github.com/dwarvesf/go-threads"
"github.com/dwarvesf/go-threads/model"
)
func main() {
client, err := threads.InitAPIClient(
threads.WithDoLogin("instagram_username", "instagram_password"),
)
if err != nil {
fmt.Println("unable init API client", err)
return
}
p, err := client.CreatePost(model.CreatePostRequest{Caption: "new post"})
if err != nil {
fmt.Println("unable create a post", err)
return
}
}
```
To mitigate the risk of blocking our users, an alternative initialization method can be implemented for the client. This method entails storing the API token and device token, which are subsequently utilized for initializing the API client.
```go
package main
import (
"fmt"
"github.com/dwarvesf/go-threads"
"github.com/dwarvesf/go-threads/model"
)
func main() {
client, err := threads.InitAPIClient(
threads.WithCridential("instagram_username", "instagram_password"),
threads.WithAPIToken("device_id", "api_token"),
)
if err != nil {
fmt.Println("unable init API client", err)
return
}
p, err := client.CreatePost(model.CreatePostRequest{Caption: "new post"})
if err != nil {
fmt.Println("unable create a post", err)
return
}
}
```
### Public API
`Coming soon`
### Private API
`Coming soon`
## Road map
- [ ] Improve the perfomance
- [ ] Listing API
- [ ] Mutation API
| 25 | 1 |
AFeng-x/SMT | https://github.com/AFeng-x/SMT | This is an official implementation for "Scale-Aware Modulation Meet Transformer". | # Scale-Aware Modulation Meet Transformer
This repo is the official implementation of "[Scale-Aware Modulation Meet Transformer](https://arxiv.org/abs/2307.08579)".
<!-- [[`SMT Paper`](https://github.com/AFeng-x/SMT)] -->
<!-- It currently includes code and models for the following tasks:
> **Image Classification**
> **Object Detection and Instance Segmentation**
> **Semantic Segmentation** -->
## 📣 Announcement
- **`18 Jul, 2023`:** The paper is available on [arXiv](https://arxiv.org/abs/2307.08579).
- **`16 Jul, 2023`:** The detection code and segmentation code are now open source and available!
- **`14 Jul, 2023`:** SMT is accepted to ICCV 2023!
## Introduction
**SMT** is capably serves as a promising new generic backbone for efficient visual modeling.
It is a new hybrid ConvNet and vision Transformer backbone, which can effectively simulate the transition from local to global dependencies as the network goes deeper, resulting in superior performance over both ConvNets and Transformers.

## Main Results on ImageNet with Pretrained Models
**ImageNet-1K and ImageNet-22K Pretrained SMT Models**
| name | pretrain | resolution |acc@1 | acc@5 | #params | FLOPs | 22K model | 1K model |
| :---: | :---: | :---: | :---: | :---: | :---: | :---: |:---: |:------: |
| SMT-T | ImageNet-1K | 224x224 | 82.2 | 96.0 | 12M | 2.4G | - | [github](https://github.com/AFeng-x/SMT/releases/download/v1.0.0/smt_tiny.pth)/[config](configs/smt/smt_tiny_224.yaml)/ |
| SMT-S | ImageNet-1K | 224x224 | 83.7 | 96.5 | 21M | 4.7G | - | [github](https://github.com/AFeng-x/SMT/releases/download/v1.0.0/smt_small.pth)/[config](configs/smt/smt_small_224.yaml) |
| SMT-B | ImageNet-1K | 224x224 | 84.3 | 96.9 | 32M | 7.7G | - | [github](https://github.com/AFeng-x/SMT/releases/download/v1.0.0/smt_base.pth)/[config](configs/smt/smt_base_224.yaml)|
| SMT-L | ImageNet-22K | 224x224 | 87.1 | 98.1 | 81M | 17.6G | [github](https://github.com/AFeng-x/SMT/releases/download/v1.0.0/smt_large_22k.pth)/[config](configs/smt/smt_large_224_22k.yaml) | [github](https://github.com/AFeng-x/SMT/releases/download/v1.0.0/smt_large_22k_224_ft.pth)/[config](configs/smt/smt_large_224_22kto1k_finetune.yaml) |
| SMT-L | ImageNet-22K | 384x384 | 88.1 | 98.4 | 81M | 51.6G | [github](https://github.com/AFeng-x/SMT/releases/download/v1.0.0/smt_large_22k.pth)/[config](configs/smt/smt_large_224_22k.yaml) | [github](https://github.com/AFeng-x/SMT/releases/download/v1.0.0/smt_large_22k_384_ft.pth)/[config](configs/smt/smt_large_384_22kto1k_finetune.yaml) |
## Main Results on Downstream Tasks
**COCO Object Detection (2017 val)**
| Backbone | Method | pretrain | Lr Schd | box mAP | mask mAP | #params | FLOPs |
| :---: | :---: | :---: | :---: | :---: | :---: | :---: | :---: |
| SMT-S | Mask R-CNN | ImageNet-1K | 3x | 49.0 | 43.4 | 40M | 265G |
| SMT-B | Mask R-CNN | ImageNet-1K | 3x | 49.8 | 44.0 | 52M | 328G |
| SMT-S | Cascade Mask R-CNN | ImageNet-1K | 3x | 51.9 | 44.7 | 78M | 744G |
| SMT-S | RetinaNet | ImageNet-1K | 3x | 47.3 | - | 30M | 247G |
| SMT-S | Sparse R-CNN | ImageNet-1K | 3x | 50.2 | - | 102M | 171G |
| SMT-S | ATSS | ImageNet-1K | 3x | 49.9 | - | 28M | 214G |
| SMT-S | DINO | ImageNet-1K | 4scale | 54.0 | - | 40M | 309G |
**ADE20K Semantic Segmentation (val)**
| Backbone | Method | pretrain | Crop Size | Lr Schd | mIoU (ss) | mIoU (ms) | #params | FLOPs |
| :---: | :---: | :---: | :---: | :---: | :---: | :---: | :---: | :---: |
| SMT-S | UperNet | ImageNet-1K | 512x512 | 160K | 49.2 | 50.2 | 50M | 935G |
| SMT-B | UperNet | ImageNet-1K | 512x512 | 160K | 49.6 | 50.6 | 62M | 1004G |
## Getting Started
- Clone this repo:
```bash
git clone https://github.com/Afeng-x/SMT.git
cd SMT
```
- Create a conda virtual environment and activate it:
```bash
conda create -n smt python=3.8 -y
conda activate smt
```
Install `PyTorch>=1.10.0` with `CUDA>=10.2`:
```bash
pip3 install torch==1.10 torchvision torchaudio --index-url https://download.pytorch.org/whl/cu113
```
- Install `timm==0.4.12`:
```bash
pip install timm==0.4.12
```
- Install other requirements:
```bash
pip install opencv-python==4.4.0.46 termcolor==1.1.0 yacs==0.1.8 pyyaml scipy ptflops thop
```
### Evaluation
To evaluate a pre-trained `SMT` on ImageNet val, run:
```bash
python -m torch.distributed.launch --nproc_per_node 1 --master_port 12345 main.py --eval \
--cfg configs/smt/smt_base_224.yaml --resume /path/to/ckpt.pth \
--data-path /path/to/imagenet-1k
```
### Training from scratch on ImageNet-1K
To train a `SMT` on ImageNet from scratch, run:
```bash
python -m torch.distributed.launch --master_port 4444 --nproc_per_node 8 main.py \
--cfg configs/smt/smt_tiny_224.yaml \
--data-path /path/to/imagenet-1k --batch-size 128
```
### Pre-training on ImageNet-22K
For example, to pre-train a `SMT-Large` model on ImageNet-22K:
```bash
python -m torch.distributed.launch --nproc_per_node 8 --master_port 12345 main.py \
--cfg configs/smt/smt_large_224_22k.yaml --data-path /path/to/imagenet-22k \
--batch-size 128 --accumulation-steps 4
```
### Fine-tuning
```bashs
python -m torch.distributed.launch --nproc_per_node 8 --master_port 12345 main.py \
--cfg configs/smt/smt_large_384_22kto1k_finetune.yaml \
--pretrained /path/to/pretrain_ckpt.pth --data-path /path/to/imagenet-1k \
--batch-size 64 [--use-checkpoint]
```
### Throughput
To measure the throughput, run:
```bash
python -m torch.distributed.launch --nproc_per_node 1 --master_port 12345 main.py \
--cfg <config-file> --data-path <imagenet-path> --batch-size 64 --throughput --disable_amp
```
## Citation
```
@misc{lin2023scaleaware,
title={Scale-Aware Modulation Meet Transformer},
author={Weifeng Lin and Ziheng Wu and Jiayu Chen and Jun Huang and Lianwen Jin},
year={2023},
eprint={2307.08579},
archivePrefix={arXiv},
primaryClass={cs.CV}
}
```
### Acknowledgement
This repository is built on top of the [timm](https://github.com/rwightman/pytorch-image-models) library and the official [Swin Transformer](https://github.com/microsoft/Swin-Transformer) repository. For object detection, we utilize [mmdetection](https://github.com/open-mmlab/mmdetection) and adopt the pipeline configuration from [Swin-Transformer-Object-Detection](https://github.com/SwinTransformer/Swin-Transformer-Object-Detection). Moreover, we incorporate [detrex](https://github.com/IDEA-Research/detrex) for implementing the DINO method. As for semantic segmentation, we employ [mmsegmentation](https://github.com/open-mmlab/mmsegmentation) and ollow the pipeline setup outlined in [Swin-Transformer-Semantic-Segmentation](https://github.com/SwinTransformer/Swin-Transformer-Semantic-Segmentation).
| 110 | 11 |
rmunate/EasyDataTable | https://github.com/rmunate/EasyDataTable | Quick and efficient creation of the datatable structure from the Laravel controllers. | # EasyDataTable: A fast, easy, and efficient way to create the BackEnd for any DataTable. (Laravel PHP Framework) | v1.x
⚙️ This library is compatible with Laravel versions 8.0 and above ⚙️
[](https://laravel.com)
[](https://laravel.com)
[](https://laravel.com)

[**----Documentación En Español----**](README_SPANISH.md)
## Table of Contents
- [Introduction](#introduction)
- [Installation](#installation)
- [Table Types](#table-types)
- [ClientSide](#clientside)
- [ServerSide](#serverside)
- [Client Side](#client-side)
- [Route](#route)
- [Controller](#controller)
- [JavaScript](#javascript)
- [HTML](#html)
- [Server Side](#server-side)
- [Route](#route-1)
- [Controller](#controller-1)
- [JavaScript](#javascript-1)
- [HTML](#html-1)
- [Creator](#creator)
- [License](#license)
## Introduction
EasyDataTable was born out of the need to standardize the backend for different DataTables commonly used in our Laravel projects. This package offers a convenient way to work with the built-in **Query Builder** in the Laravel framework to generate tables quickly with all the capabilities required by [DataTables](https://datatables.net/).
## Installation
To install the package via **Composer**, run the following command:
```shell
composer require rmunate/easy-datatable
```
## Table Types
| Type | Description |
| ---- | ----------- |
| **ClientSide** | This type of table is used when we send all the data to the FrontEnd, and it is responsible for organizing, filtering, and generating any type of interactivity with the table. However, this type is not recommended for large volumes of data, as the client's experience may be affected while the library renders all the data, which could take a considerable amount of time. |
| **ServerSide** | This type of table is used to handle high volumes of data. It only loads a limited amount of data from the backend on each interaction with the table. Commonly, it renders data in chunks, for example, up to a maximum of 100 records, depending on the table's pagination settings on the FrontEnd. In conclusion, this type of table is highly recommended if you want to maintain a fast and efficient interaction with the application. |
## Client Side
Let's see how to create the backend for a ClientSide table.
### Route
Define a GET route without sending any arguments, similar to what is shown below. If you want to download the example, you can find it [here](src/Examples/ClientSide).
```php
Route::get('/module/datatable', [ModuleController::class, 'dataTable']);
```
### Controller
Now that we have the route, let's proceed to create the method in the corresponding controller. This method will always handle **Query Builder**. For now, using *Eloquent* is not possible, as we need to know the column names to be rendered on the FrontEnd, and Query Builder offers more convenient ways to standardize it.
```php
<?php
//Import the use of the library.
use Rmunate\EasyDatatable\EasyDataTable;
//...
/*
In the Request, you can send conditions for the query if required; otherwise, you can omit it.
*/
public function dataTable(Request $request)
{
/*
The first thing we will do is create our query using Query Builder.
An important step is to use the "select" method, where you define the columns to select.
You can assign a different alias to the column name of the database table if you wish.
Below is an example of how to generate a query with some relationships.
*/
$query = DB::table('novedades')
->leftJoin('tipo_novedades', 'tipo_novedades.id', '=', 'novedades.tipo_novedad_id')
->leftJoin('empleados', 'empleados.id', '=', 'novedades.empleado_id')
->select(
'empleados.cedula AS identification',
'empleados.nombre AS employee',
'tipo_novedades.nombre AS novelty_type',
'novedades.descripcion AS description',
'novedades.dias_calendario AS calendar_days',
'novedades.dias_habiles AS business_days',
'novedades.fecha_inicial AS initial_date',
'novedades.fecha_final AS final_date',
)
->where('empleados.empresa', $request->company); /* (Optional) Only if you need to apply your conditions */
/*
(Optional)
Sometimes we need to send additional information, such as permissions, to determine if row values can be altered.
In such cases, we can create variables with the additional data we want to send to the front end.
In the current example, I will only check if the logged-in user has edit permissions.
*/
$permissionEdit = Auth::user()->can('novedades.editar');
/*
Now let's start using the library. The first thing we'll do is create an object with an instance of EasyDataTable.
*/
$datatable = new EasyDataTable();
/*
Now we'll define that we want to create the data for a "ClientSide" type.
*/
$datatable->clientSide();
/*
Next, using the "query" method, we'll send the QueryBuilder query, which, as you can see, does not have any final methods.
You would commonly use "get" to retrieve data, but in this case, you should not use it; instead, send the QueryBuilder instance to the library.
*/
$datatable->query($query);
/*
(Optional)
The "map" method is not mandatory; you can omit it if you want to render the data on the front end exactly as it is returned from the database.
However, if you want to apply specific formats and add columns or data, you can do something like this.
*/
$datatable->map(function($row) use ($permissionEdit){
/*
Note that within the "map" method, the "$row" alias represents the treatment of each line of the table to be returned.
Additionally, through the "use" statement, you can pass additional variables to the library's context,
which you need for data treatment or to add them as additional columns.
As you can see, the variable "$row" allows us to access each of the aliases created in our query.
It is essential that the array indices to be returned in this method match the aliases used in the QueryBuilder query.
If you notice, only the additional columns to be returned have names that are not consistent with the aliases set in the QueryBuilder query.
*/
return [
'identification' => $row->identification,
'employee' => strtolower($row->employee),
'novelty_type' => strtolower($row->novelty_type),
'description' => strtolower($row->description),
'calendar_days' => $row->calendar_days,
'business_days' => $row->business_days,
'initial_date' => date('d/m/Y', strtotime($row->initial_date)),
'final_date' => date('d/m/Y', strtotime($row->final_date)),
"action" => [
"editar" => $permissionEdit
]
];
});
/*
Finally, using the "response" method, you'll get the response required by the FrontEnd to render the data.
*/
return $datatable->response();
}
```
### JavaScript
Below is a basic example of DataTable configuration for the FrontEnd. Here, it's a matter of using what DataTable offers as a JavaScript library.
```javascript
// First, we need to initialize the table with the DataTable() function.
// The selector '#datatable' should be the ID or class of the table in the HTML.
var dataTable = $('#datatable').DataTable({
processing: true, // Enable processing indicator
responsive: true, // Enable responsive design functionality
pagingType: "full_numbers", // Show all pagination controls
/* Here, you have two options to get the data for the table: */
// OPTION 1: Save the backend response in a variable and use the "data" property to pass the values to the DataTable.
// data: dataBackEnd,
// OPTION 2: Use the Ajax property to get the data from a URL on the backend.
ajax: {
url: baseUrl + '/module/datatable', // Change the URL that returns data in JSON format here
dataSrc: 'data' // Specify the property that contains the data in the JSON response
},
/* Next, we define the table columns and the data we want to display in each column. */
columns: [
{ data: "identification" },
{ data: "employee" },
{ data: "novelty_type" },
{ data: "description" },
{ data: "calendar_days" },
{ data: "business_days" },
{ data: "initial_date" },
{ data: "final_date" },
{ data: "action",
/* The "render" method allows you to customize how the content of a column is displayed. */
render: function (data, type, row, meta) {
let btnEdit = '';
// In the current example, we validate the edit permission to render a button with the edit action.
if (data.editar) {
btnEdit = `<button class="btn btn-sm btn-info btn-edit" data-id="${row.identification}" data-employee="${row.employee}" title="Edit">
<i class="fa flaticon-edit-1"></i>
</button>`;
}
return `<div class='btn-group'>${btnEdit}</div>`;
},
orderable: false // Specify if the column is sortable or not.
}
],
/* Finally, we configure the language of the table using the corresponding translation file. */
language: {
url: "https://cdn.datatables.net/plug-ins/1.13.5/i18n/es-ES.json"
}
});
```
#### HTML
In the HTML, you should have a structure similar to the following. Make sure that the number of columns defined in the JavaScript matches the ones defined in the HTML:
```html
<script src="../jquery-3.6.0.min.js"></script>
<script src="../dataTables.min.js"></script>
<table id="datatable" class="table table-striped table-hover">
<thead>
<tr>
<th>Identification</th>
<th>Employee</th>
<th>Novelty Type</th>
<th>Description</th>
<th>Calendar Days</th>
<th>Business Days</th>
<th>Initial Date</th>
<th>Final Date</th>
<th>Action</th>
</tr>
</thead>
</table>
```
## Server Side
Now let's see how to create the backend for a ServerSide table. You will notice many parts are similar to the previous example.
### Route
Define a GET route without sending any arguments, similar to what is shown below. You can download the example [here](src/Examples/ServerSide).
```php
Route::get('/module/datatable', [ModuleController::class, 'dataTable']);
```
### Controller
Now that we have the route, let's proceed to create the method in the corresponding controller. This method will always handle **Query Builder**. For now, using *Eloquent* is not possible, as we need to know the column names to be rendered on the FrontEnd, and Query Builder offers more convenient ways to standardize it.
```php
<?php
use Rmunate\EasyDatatable\EasyDataTable;
//...
public function dataTable(Request $request)
{
/*
The first thing we will do is create our query using Query Builder. An essential step is to use the "select" method,
where you define the columns to select. You can assign a different alias to the column name of the database table if you wish.
Below is an example of how to generate a query with some relationships.
*/
$query = DB::table('novedades')
->leftJoin('tipo_novedades', 'tipo_novedades.id', '=', 'novedades.tipo_novedad_id')
->leftJoin('empleados', 'empleados.id', '=', 'novedades.empleado_id')
->select(
'empleados.cedula AS identification',
'empleados.nombre AS employee',
'tipo_novedades.nombre AS novelty_type',
'novedades.descripcion AS description',
'novedades.dias_calendario AS calendar_days',
'novedades.dias_habiles AS business_days',
'novedades.fecha_inicial AS initial_date',
'novedades.fecha_final AS final_date',
);
/*
(Optional)
Sometimes we need to send additional information, such as permissions, to determine if row values can be altered.
In such cases, we can create variables with the additional data we want to send to the front end.
In the current example, I will only check if the logged-in user has edit permissions.
*/
$permissionEdit = Auth::user()->can('novedades.editar');
/*
Now we will start using the library. The first thing we will do is create an object with an instance of EasyDataTable.
*/
$datatable = new EasyDataTable();
/*
Now we will define that we want to create data for a "ServerSide" type.
*/
$datatable->serverSide();
/*
For this type of table, it is necessary to pass the Request to the EasyDataTable instance as follows.
*/
$datatable->request($request);
/*
Next, using the "query" method, we will send the QueryBuilder query. As you can see, it does not have any final methods.
Normally, you would use "get", but in this case, you should not use it; you must send the QueryBuilder instance to the library.
*/
$datatable->query($query);
/*
(Optional)
The "map" method is not mandatory; you can omit it if you want to render the data in the front end exactly as it is returned from the database.
Otherwise, if you want to format specific data, and add additional columns or data, you can do something like the following.
*/
$datatable->map(function($row) use($editar){
/*
Within the "map" method, you will have an alias "$row" representing the treatment for each line of the table to be returned.
Additionally, through the "use" keyword, you can pass additional variables to the context of the EasyDataTable class,
which you may need for data processing or for adding them as additional columns.
As you can see, the "$row" variable allows us to access each of the aliases created in our query.
It is essential that the indexes of the array to be returned in this method match the aliases in the QueryBuilder query.
If you notice, only the additional columns to be returned have names that do not match the aliases used in the QueryBuilder query.
*/
return [
'identification' => $row->identification,
'employee' => strtolower($row->employee),
'novelty_type' => strtolower($row->novelty_type),
'description' => strtolower($row->description),
'calendar_days' => $row->calendar_days,
'business_days' => $row->business_days,
'initial_date' => date('d/m/Y', strtotime($row->initial_date)),
'final_date' => date('d/m/Y', strtotime($row->final_date)),
"action" => [
"editar" => $editar
]
];
});
/*
This type of table commonly comes with a search feature, which you can configure from the "search" method.
Here, you can create a QueryBuilder closure where you apply your conditionals. Below is an example.
*/
$datatable->search(function($query, $search){
/*
If you need to use any additional variables, remember that you can add the "use()" clause,
where you can pass variables to the context of the EasyDataTable class.
*/
return $query->where(function($query) use ($search) {
$query->where('novedades.id', 'like', "%{$search}%")
->orWhere('novedades.descripcion', 'like', "%{$search}%")
->orWhere('tipo_novedades.nombre', 'like', "%{$search}%")
->orWhere('empleados.nombre', 'like', "%{$search}%")
->orWhere('empleados.cedula', 'like', "%{$search}%");
});
});
/*
Finally, using the "response" method, you'll get the response required by the FrontEnd to render the data.
*/
return $datatable->response();
}
```
### JavaScript
Below is a basic example of DataTable configuration for the FrontEnd. Here, it's a matter of using what DataTable offers as a JavaScript library.
```javascript
// First, we need to initialize the table with the DataTable() function.
// The selector '#datatable' should be the ID or class of the table in the HTML.
var dataTable = $('#datatable').DataTable({
processing: true, // Enable processing indicator
responsive: true, // Enable responsive design functionality
serverSide: true, // Enable ServerSide
pagingType: "full_numbers", // Show all pagination controls
ajax: { // ServerSide Ajax request
url: baseUrl + "/module/datatable",
dataType:"JSON",
type:"GET"
},
columns: [
{ data: "identification" },
{ data: "employee" },
{ data: "novelty_type" },
{ data: "description" },
{ data: "calendar_days" },
{ data: "business_days" },
{ data: "initial_date" },
{ data: "final_date" },
{ data: "action",
/* The "render" method allows you to customize how the content of a column is displayed. */
render: function (data, type, row, meta) {
let btnEdit = '';
// In the current example, we validate the edit permission to render a button with the edit action.
if (data.editar) {
btnEdit = `<button class="btn btn-sm btn-info btn-edit" data-id="${row.identification}" data-employee="${row.employee}" title="Edit">
<i class="fa flaticon-edit-1"></i>
</button>`;
}
return `<div class='btn-group'>${btnEdit}</div>`;
},
orderable: false // Specify if the column is sortable or not.
}
],
/* Finally, configure the language of the table using the corresponding translation file. */
language: {
url: "https://cdn.datatables.net/plug-ins/1.13.5/i18n/es-ES.json"
}
});
```
### HTML
In the HTML, you should have a structure similar to the following. Make sure that the number of columns defined in the JavaScript matches the ones defined in the HTML:
```html
<script src="../jquery-3.6.0.min.js"></script>
<script src="../dataTables.min.js"></script>
<table id="datatable" class="table table-striped table-hover">
<thead>
<tr>
<th>Identification</th>
<th>Employee</th>
<th>Novelty Type</th>
<th>Description</th>
<th>Calendar Days</th>
<th>Business Days</th>
<th>Initial Date</th>
<th>Final Date</th>
<th>Action</th>
</tr>
</thead>
</table>
```
## Creator
- 🇨🇴 Raúl Mauricio Uñate Castro
- Email: [email protected]
## License
This project is under the [MIT License](https://choosealicense.com/licenses/mit/). | 20 | 2 |
verytinydever/angular-metamask-solidity | https://github.com/verytinydever/angular-metamask-solidity | null | # BlockchainPoll
This project was generated with [Angular CLI](https://github.com/angular/angular-cli) version 10.0.0.
## Development server
Run `ng serve` for a dev server. Navigate to `http://localhost:4200/`. The app will automatically reload if you change any of the source files.
## Code scaffolding
Run `ng generate component component-name` to generate a new component. You can also use `ng generate directive|pipe|service|class|guard|interface|enum|module`.
## Build
Run `ng build` to build the project. The build artifacts will be stored in the `dist/` directory. Use the `--prod` flag for a production build.
## Running unit tests
Run `ng test` to execute the unit tests via [Karma](https://karma-runner.github.io).
## Running end-to-end tests
Run `ng e2e` to execute the end-to-end tests via [Protractor](http://www.protractortest.org/).
## Further help
To get more help on the Angular CLI use `ng help` or go check out the [Angular CLI README](https://github.com/angular/angular-cli/blob/master/README.md).
| 10 | 0 |
pikho/ppromptor | https://github.com/pikho/ppromptor | Prompt-Promptor is a python library for automatically generating prompts using LLMs | # Prompt-Promptor: An Autonomous Agent Framework for Prompt Engineering
Prompt-Promptor(or shorten for ppromptor) is a Python library designed to automatically generate and improve prompts for LLMs. It draws inspiration from autonomous agents like AutoGPT and consists of three agents: Proposer, Evaluator, and Analyzer. These agents work together with human experts to continuously improve the generated prompts.
## 🚀 Features:
- 🤖 The use of LLMs to prompt themself by giving few samples.
- 💪 Guidance for OSS LLMs(eg, LLaMA) by more powerful LLMs(eg, GPT4)
- 📈 Continuously improvement.
- 👨👨👧👦 Collaboration with human experts.
- 💼 Experiment management for prompt engineering.
- 🖼 Web GUI interface.
- 🏳️🌈 Open Source.
## Warning
- This project is currently in its earily stage, and it is anticipated that there will be major design changes in the future.
- The main function utilizes an infinite loop to enhance the generation of prompts. If you opt for OpenAI's ChatGPT as Target/Analysis LLMs, kindly ensure that you set a usage limit.
## Concept

A more detailed class diagram could be found in [doc](https://github.com/pikho/ppromptor/tree/main/doc)
## Installations
### From Github
1. Install Package
```
pip install ppromptor --upgrade
```
2. Clone Repository from Github
```
git clone https://github.com/pikho/ppromptor.git
```
3. Start Web UI
```
cd ppromptor
streamlit run ui/app.py
```
### Running Local Model(WizardLM)
1. Install Required Packages
```
pip install requirements_local_model.txt
```
2. Test if WizardLM can run correctly
```
cd <path_to_ppromptor>/ppromptor/llms
python wizardlm.py
```
## Usage
1. Start the Web App
```
cd <path_to_ppromptor>
streamlit run ui/app.py
```
2. Load the Demo Project
Load `examples/antonyms.db`(default) for demo purposes. This demonstrates how to use ChatGPT to guide WizardLM to generate antonyms for given inputs.
3. Configuration
In the Configuration tab, set `Target LLM` as `wizardlm` if you can infer this model locally. Or choose both `Target LLM` and `Analysis LLM` as `chatgpt`. If chatgpt is used, please provide the OpenAI API Key.
4. Load the dataset
The demo project has already loaded 5 records. You can add your own dataset.(Optional)
5. Start the Workload
Press the `Start` button to activate the workflow.
5. Prompt Candidates
Generated prompts can be found in the `Prompt Candidates` tab. Users can modify generated prompts by selecting only 1 Candidate, then modifying the prompt, then `Create Prompt`. This new prompt will be evaluated by Evaluator agent and then keep improving by Analyzer agent. By selecting 2 prompts, we can compare these prompts side by side.


## Contribution
We welcome all kinds of contributions, including new feature requests, bug fixes, new feature implementation, examples, and documentation updates. If you have a specific request, please use the "Issues" section. For other contributions, simply create a pull request (PR). Your participation is highly valued in improving our project. Thank you! | 32 | 4 |
MIDORIBIN/langchain-gpt4free | https://github.com/MIDORIBIN/langchain-gpt4free | LangChain x gpt4free | # LangChain gpt4free
LangChain gpt4free is an open-source project that assists in building applications using LLM (Large Language Models) and provides free access to GPT4/3.5.
## Installation
To install langchain_g4f, run the following command:
```shell
pip install git+https://github.com/MIDORIBIN/langchain-gpt4free.git
```
This command will install langchain_g4f.
## Usage
Here is an example of how to use langchain_g4f
```python
from g4f import Provider, Model
from langchain.llms.base import LLM
from langchain_g4f import G4FLLM
def main():
llm: LLM = G4FLLM(
model=Model.gpt_35_turbo,
provider=Provider.Aichat,
)
res = llm('hello')
print(res) # Hello! How can I assist you today?
if __name__ == '__main__':
main()
```
The above sample code demonstrates the basic usage of langchain_g4f. Choose the appropriate model and provider, initialize the LLM, and then pass input text to the LLM object to obtain the result.
For other samples, please refer to the following [sample directory](./sample/).
## Support and Bug Reports
For support and bug reports, please use the GitHub Issues page.
Access the GitHub Issues page and create a new issue. Select the appropriate label and provide detailed information.
## Contributing
To contribute to langchain_g4f, follow these steps to submit a pull request:
1. Fork the project repository.
2. Clone the forked repository to your local machine.
3. Make the necessary changes.
4. Commit the changes and push to your forked repository.
5. Create a pull request towards the original project repository.
| 33 | 12 |
GuiWonder/EarlySummerMincho | https://github.com/GuiWonder/EarlySummerMincho | Early Summer Mincho 初夏明朝體 | **繁體中文** [简体中文](README-SC.md)
# Early Summer Mincho 初夏明朝體
一款接近傳統印刷體的中文字型,基於[思源宋體](https://github.com/adobe-fonts/source-han-serif)。
## 預覽


> Note: 本字型可通過 locl 特性改變不同的標點符號。
## 字重與格式
包含可變字體,以及 7 種粗細的靜態字體,使用 TrueType 格式。

## 下載字型
可从本站 [Releases](../../releases) 頁面下載字型。
## 授權
遵循 [SIL Open Font License 1.1](./LICENSE.txt)。
## 鳴謝
- [思源宋體](https://github.com/adobe-fonts/source-han-serif)
- [FontTools](https://github.com/fonttools/fonttools)
- [AFDKO](https://github.com/adobe-type-tools/afdko/)
- [FontForge](https://github.com/fontforge/fontforge)
| 21 | 0 |
Git-K3rnel/VoorivexChallenge | https://github.com/Git-K3rnel/VoorivexChallenge | This is a writeup about challenges in voorivex challenge (Berserk vs Zodd) | # VoorivexChallenge - Zodd
This is a writeup about all levels in voorivex challenge (Berserk vs Zodd)
### Level 1
```
change the url to https://z.voorivex.academy/level-2
```
### Level 2
```
change the url to https://z.voorivex.academy/level%203
```
### Level 3
```
1.Find the location of "off.png"
2.Go to this url : https://z.voorivex.academy/level%203/assets/png/off.png
3.Change "off.png" to "on.png"
4.You will find "/f2cerd3x" then go to : https://z.voorivex.academy/F2CERD3X/
```
### Level 4
```
1.Use "view-source:" like this : view-source:https://z.voorivex.academy/F2CERD3X to see the source
2.You will find "/pfKL0e9_" then go to : https://z.voorivex.academy/pfKL0e9_/
```
### Level 5
```
1.Go to this path : https://z.voorivex.academy/pfKL0e9_/assets/png/
2.You will find "fixed.png" url click on it and then go to "https://z.voorivex.academy/Ux0_221R/"
```
### Level 6
```
1.Curl like this : curl -v -H "User-Agent: Mozilla/5.0 (Linux; Android 12; SM-S906N Build/QP1A.190711.020; wv) AppleWebKit/537.36 (KHTML, like Gecko) Version/4.0 Chrome/80.0.3987.119 Mobile Safari/537.36" https://z.voorivex.academy/Ux0_221R/
2.You will recieve the "/cLps09-o" , then go to https://z.voorivex.academy/cLps09-o/
```
### Level 7
```
1.Curl like this : curl -v -H "User-Agent: GPLUS" https://z.voorivex.academy/cLps09-o/
2.You will recieve the "/GhopI-o1" , then go to https://z.voorivex.academy/GhopI-o1/
```
### Level 8
```
1.Curl like this : curl https://z.voorivex.academy/GhopI-o1/ -H "referer: https://google.com"
2.You will recieve the "/IkLmOpmN" , then go to https://z.voorivex.academy/IkLmOpmN/
```
### Level 9
```
1.Curl like this : curl https://z.voorivex.academy/IkLmOpmN/ -H "referer: nowhere"
2.You will recieve the "/PbDXzQW8" , then go to https://z.voorivex.academy/PbDXzQW8/
```
### Level 10
```
1.Curl like this : curl https://z.voorivex.academy/PbDXzQW8/ -X POST
2.You will recieve the "/kLmn6GHn" , then go to https://z.voorivex.academy/kLmn6GHn/
```
### Level 11
```
1.Curl like this : curl https://z.voorivex.academy/kLmn6GHn/ -X DELETE
2.You will recieve the "/mn7LMcv3" , then go to https://z.voorivex.academy/mn7LMcv3/
```
### Level 12
```
1.Curl like this : curl https://z.voorivex.academy/mn7LMcv3/?SuperSecret
2.You will recieve the "/mvfnINC5" , then go to https://z.voorivex.academy/mvfnINC5/
```
### Level 13
```
1.Curl like this : curl https://z.voorivex.academy/mvfnINC5/ -X POST -d "letter=hi"
2.You will recieve the "/xuIdnc84" , then go to https://z.voorivex.academy/xuIdnc84/
```
### Level 14
```
1.Curl like this : url https://z.voorivex.academy/xuIdnc84/ -X POST -d "enabled=true"
2.You will recieve the "/vmjINDl9" , then go to https://z.voorivex.academy/vmjINDl9/
```
### Level 15
```
1.View source page you will find letters
2.Assemble them and you get "/xkl1m8tX"
3.Put the above string into "decode" function embedded in the page scripts tag
4.You will get "wjk0l7sW" , then go to https://z.voorivex.academy/wjk0l7sW/
```
### Level 16
```
1.Page is using xhr and sends xhr.send()
2.Call in the browser console : "xhr.response"
3.You will get "/fvjotg9C" , then go to https://z.voorivex.academy/fvjotg9C/
```
### Level 17
```
1.Dig like this : "dig z.voorivex.academy any" or "dig z.voorivex.academy txt"
2.You will get "/4080b6d4/" then go to https://z.voorivex.academy/4080b6d4/
```
### Level 18
```
1.Go to redrum69 image location
2.Reverse the file name "redrum69"
3.It will be "96murder" , then go to https://z.voorivex.academy/96murder
```
### Level 19
```
1.Curl like this : curl https://z.voorivex.academy/96murder/ -I
2.You will get "/fibLPc23" , then go to https://z.voorivex.academy/fibLPc23/
```
### Level 20
```
1.This url in burp: https://z.voorivex.academy/fibLPc23/ is redirected to https://z.voorivex.academy/f1bLPc23/
and in this redirection (302) you can see the path "/ioOvLC23"
2.Then go to https://z.voorivex.academy/ioOvLC23/
```
### Level 21
```
1.Curl like this : curl https://z.voorivex.academy/ioOvLC23/ -H "Cookie: Chocolate"
2.You will get "/tigth32x" , then go to https://z.voorivex.academy/tigth32x
```
### Level 22
```
1.Curl like this : curl https://z.voorivex.academy/tigth32x/ -I, you will see "set-cookie" header
2.Curl like this : curl https://z.voorivex.academy/tigth32x/ -H "Cookie: auth=1"
3.You will get "/lhnkOVv7" , then go to https://z.voorivex.academy/lhnkOVv7/
```
### Level 23
```
1.Curl like this : curl https://z.voorivex.academy/lhnkOVv7/ -I, you will see "set-cookie" header in base64
2.Curl like this : curl https://z.voorivex.academy/lhnkOVv7/ -H "Cookie: auth=MQ%3D%3D"
3.You will get "/iyhjPCc2" , then go to https://z.voorivex.academy/iyhjPCc2/
```
### Level 24
```
1.Open this url : https://z.voorivex.academy/iyhjPCc2/
2.Enter passwrod admin, admin
3.You will get "/vmJIFmc0" , then go to https://z.voorivex.academy/vmJIFmc0/
```
### Level 25
```
1.Curl like this : curl https://z.voorivex.academy/vmJIFmc0/ -H "Authorization: Basic WDpZ"
2.You will get "/bkfgoOVx" then go to https://z.voorivex.academy/bkfgoOVx/
```
### Level 26
1.Make HTML form like this and submit it:
```html
<!DOCTYPE html>
<html lang="en">
<head>
<meta charset="UTF-8">
<meta name="viewport" content="width=device-width, initial-scale=1.0">
<title>Document</title>
</head>
<body>
<form method="POST" action="https://z.voorivex.academy/bkfgoOVx/assets/challenge.php/">
<input name="key" type="text">
<button type="submit">submit</button>
</form>
</body>
</html>
```
2.You will be redirected to https://z.voorivex.academy/giHFNVre/
### Level 27
```
1.Call "key(_0x59a9a2('0xaa'))" in the browser console
2.You will get "2054009446" , then go to https://z.voorivex.academy/2054009446/
```
### Level 28
```
1.Call "generateRandomString(c(0x0), 12)" in the browser console, you will get : "e__hel_allea"
2.Call "generateRandomString(;e__hel_allea')" in the browser console, you will get : "l__ala_eel"
3.Then go to https://z.voorivex.academy/l__ala_eel/
```
### Level 29
```
VIM Makes swp file automatically whenever you open a file with VIM
so index.php is open on the server now, just download the swp file of it
1.Wget like this : wget https://z.voorivex.academy/l__ala_eel/.index.php.swp
2.cat .index.php.swp, you will see this line : "if ($_GET['veryverysecretkey'] == 'veryverysecretvalue')" in the output
3.Open this url in browser : https://z.voorivex.academy/l__ala_eel/?veryverysecretkey=veryverysecretvalue
```
### Level 30
```
1.Curl like this : curl https://z.voorivex.academy/tibmHV32/ -H "X-Forwarded-For: 127.10.9.1"
2.You will get "/vkfVJCdx" , then go to https://z.voorivex.academy/vkfVJCdx
```
### Level 31
```
1.Curl like this : curl https://z.voorivex.academy/ -H "Host: 01.voorivex.academy"
2.You will get "/tb39kfmI" , then go to https://z.voorivex.academy/tb39kfmI
```
### Level 32
1.Reverse the function like this:
```php
<?php
function dec($data, $key) {
$data = base64_decode($data);
$result = '';
$keyLength = strlen($key);
$dataLength = strlen($data);
for ($i = 0; $i < $dataLength; $i++) {
$char = $data[$i];
$keyChar = $key[$i % $keyLength];
$decodeChar = chr(ord($char) - ord($keyChar));
$result .= $decodeChar;
}
return $result;
}
$encdata = "3KXUpcSiqsmn4+a1";
$key = "tqbAtb7V0t";
$decdata = dec($encdata, $key);
echo $decdata;
?>
```
```
2.You will recieve the password : h4rdP@ssworD
3.Send request to challenge.php and you will get "pnq2K_s2On" in the Location header
4.Go to https://z.voorivex.academy/pnq2K_s2On
```
### Level 33
```
1.Wget the png file : wget https://z.voorivex.academy/pnq2K_s2On/zodd-final.png
2.Extract anything hidden in the image : binwalk -e zodd-final.png
3.The zip file inside is password protected
4.Use tweakpng tool to resize the image and change height to 1600
5.You will see the full image with password on the bottom right
6.The password of zip file is : 0oo000o0o
7.cat z.txt file and you will see this text : "I didn't think you would reach here, continue with berserK"
8.Then go to this url : https://z.voorivex.academy/berserK
```
## Booooooom, you defeated the zodd :)
| 10 | 2 |
sxyazi/yazi | https://github.com/sxyazi/yazi | ⚡️ Blazing fast terminal file manager written in Rust, based on async I/O. | ## Yazi - ⚡️ Blazing Fast Terminal File Manager
Yazi ("duck" in Chinese) is a terminal file manager written in Rust, based on non-blocking async I/O. It aims to provide an efficient, user-friendly, and customizable file management experience.
https://github.com/sxyazi/yazi/assets/17523360/740a41f4-3d24-4287-952c-3aec51520a32
⚠️ Note: Yazi is currently in active development and may be unstable. The API is subject to change without prior notice.
## Installation
Before getting started, ensure that the following dependencies are installed on your system:
- nerd-fonts (_required_, for icons)
- ffmpegthumbnailer (_optional_, for video thumbnails)
- unar (_optional_, for archive preview)
- jq (_optional_, for JSON preview)
- poppler (_optional_, for PDF preview)
- fd (_optional_, for file searching)
- rg (_optional_, for file content searching)
- fzf (_optional_, for directory jumping)
- zoxide (_optional_, for directory jumping)
<details>
<summary>Arch Linux</summary>
Install with paru or your favorite AUR helper:
```bash
paru -S yazi ffmpegthumbnailer unarchiver jq poppler fd ripgrep fzf zoxide
```
Or, you can replace `yazi` with `yazi-bin` package if you want pre-built binary instead of compiling by yourself.
</details>
<details>
<summary>macOS</summary>
Install the dependencies with Homebrew:
```bash
brew install ffmpegthumbnailer unar jq poppler fd ripgrep fzf zoxide
brew tap homebrew/cask-fonts && brew install --cask font-symbols-only-nerd-font
```
And download the latest release [from here](https://github.com/sxyazi/yazi/releases). Or you can install Yazi via cargo:
```bash
cargo install --git https://github.com/sxyazi/yazi.git
```
</details>
<details>
<summary>Nix</summary>
Nix users can install Yazi from [the NUR](https://github.com/nix-community/nur-combined/blob/master/repos/xyenon/pkgs/yazi/default.nix):
```bash
nix-env -iA nur.repos.xyenon.yazi
```
Or add the following to your configuration:
```nix
# configuration.nix
environment.systemPackages = with pkgs; [
nur.repos.xyenon.yazi
];
```
If you prefer to use the most recent code, use `nur.repos.xyenon.yazi-unstable` instead.
</details>
<details>
<summary>Build from source</summary>
Execute the following commands to clone the project and build Yazi:
```bash
git clone https://github.com/sxyazi/yazi.git
cd yazi
cargo build --release
```
Then, you can run:
```bash
./target/release/yazi
```
</details>
## Usage
```bash
yazi
```
If you want to use your own config, copy the [config folder](https://github.com/sxyazi/yazi/tree/main/config/preset) to `~/.config/yazi`, and modify it as you like.
There is a wrapper of yazi, that provides the ability to change the current working directory when yazi exiting, feel free to use it:
```bash
function ya() {
tmp="$(mktemp -t "yazi-cwd.XXXXX")"
yazi --cwd-file="$tmp"
if cwd="$(cat -- "$tmp")" && [ -n "$cwd" ] && [ "$cwd" != "$PWD" ]; then
cd -- "$cwd"
fi
rm -f -- "$tmp"
}
```
## Discussion
- Discord Server (English mainly): https://discord.gg/qfADduSdJu
- Telegram Group (Chinese mainly): https://t.me/yazi_rs
## Image Preview
| Platform | Protocol | Support |
| ------------- | -------------------------------------------------------------------------------- | --------------------- |
| Kitty | [Terminal graphics protocol](https://sw.kovidgoyal.net/kitty/graphics-protocol/) | ✅ Built-in |
| WezTerm | [Terminal graphics protocol](https://sw.kovidgoyal.net/kitty/graphics-protocol/) | ✅ Built-in |
| Konsole | [Terminal graphics protocol](https://sw.kovidgoyal.net/kitty/graphics-protocol/) | ✅ Built-in |
| iTerm2 | [Inline images protocol](https://iterm2.com/documentation-images.html) | ✅ Built-in |
| Hyper | [Sixel graphics format](https://www.vt100.net/docs/vt3xx-gp/chapter14.html) | ✅ Built-in |
| foot | [Sixel graphics format](https://www.vt100.net/docs/vt3xx-gp/chapter14.html) | ✅ Built-in |
| X11 / Wayland | Window system protocol | ☑️ Überzug++ required |
| Fallback | [Chafa](https://hpjansson.org/chafa/) | ☑️ Überzug++ required |
Yazi automatically selects the appropriate preview method for you, based on the priority from top to bottom.
That's relying on the `$TERM`, `$TERM_PROGRAM`, and `$XDG_SESSION_TYPE` variables, make sure you don't overwrite them by mistake!
For instance, if your terminal is Alacritty, which doesn't support displaying images itself, but you are running on an X11/Wayland environment,
it will automatically use the "Window system protocol" to display images -- this requires you to have [Überzug++](https://github.com/jstkdng/ueberzugpp) installed.
## TODO
- [x] Add example config for general usage, currently please see my [another repo](https://github.com/sxyazi/dotfiles/tree/main/yazi) instead
- [x] Integration with fzf, zoxide for fast directory navigation
- [x] Integration with fd, rg for fuzzy file searching
- [x] Documentation of commands and options
- [x] Support for Überzug++ for image previews with X11/wayland environment
- [ ] Batch renaming support
## License
Yazi is MIT licensed.
| 250 | 10 |
Moriafly/SaltUI | https://github.com/Moriafly/SaltUI | SaltUI(UI for Salt Player) 是提取自椒盐音乐的 UI 风格组件,用以快速生成椒盐音乐风格用户界面 | # SaltUI
SaltUI(UI for Salt Player) 是提取自[椒盐音乐](https://github.com/Moriafly/SaltPlayerSource)的 UI 风格组件,用以快速生成椒盐音乐风格用户界面。
本库将会广泛用以椒盐系列 App 开发,以达到快速开发目的。
<img src="img/app.jpg" width="200px"/>
## 使用
### 1. 项目 Gradle 添加 JitPack 依赖
```groovy
allprojects {
repositories {
// ...
maven { url 'https://jitpack.io' }
}
}
```
### 2. 要使用的模块下添加 SaltUI 依赖
最新版本⬇️⬇️⬇️
[](https://jitpack.io/#Moriafly/SaltUI)
```groovy
dependencies {
// ...
// 将 <VERSION> 替换为具体的版本号,如 0.1.0-dev04
// 即 implementation 'com.github.Moriafly:SaltUI:0.1.0-dev04'
// 推荐使用上方最新版本或稳定版本(若有)
implementation 'com.github.Moriafly:SaltUI:<VERSION>'
}
```
## 设计规范和使用介绍
组件位于 com.moriafly.salt.ui 包下,下面分为主题、页面、文本、按钮和点击。
演示项目(DEMO)在 app 模块。
### 主题
由 SaltTheme 下 SaltColors 和 SaltTextStyles 组成。
#### SaltColors
| 颜色值 | 说明 |
|---------------|-----------------------------|
| highlight | 软件强调色 |
| text | 主文本颜色 |
| subText | 次要文本颜色 |
| background | 用于整个 App 最底层颜色,默认背景色(底层背景色) |
| subBackground | 次要背景色(上层背景色) |
```kotlin
@Composable
fun AppTheme(
content: @Composable () -> Unit
) {
val colors = if (isSystemInDarkTheme()) {
darkSaltColors()
} else {
lightSaltColors()
}
SaltTheme(
colors = colors
) {
content()
}
}
```
#### SaltTextStyles
| 颜色值 | 说明 |
|-----------|--------|
| main | 主文本样式 |
| sub | 次要文本样式 |
| paragraph | 段落文本样式 |
### 页面(基础)
| 名称 | 用途 |
|---------------|----------------------------------|
| TitleBar | 标题栏 |
| BottomBar | 底部栏 |
| BottomBarItem | 底部栏子项 |
| RoundedColumn | 以 subBackground 为底色构建圆角内容 Column |
### 页面(内部)
以下的元素要使用在 RoundedColumn 中。
| 名称 | 用途 |
|---------------|-------------------------------------|
| ItemTitle | 构建内容界面标题 |
| ItemText | 构建内容界面说明文本 |
| Item | 默认列表项目(可设置图标、标题和副标题) |
| ItemSwitcher | 默认开关项目(可设置图标、标题和副标题) |
| ItemCheck | 选中项目 |
| ItemValue | 类似 Key - Value |
| ItemEdit | 默认文本框 |
| ItemSpacer | 默认内部的竖向间隔 |
| ItemContainer | 在内容界面构建拥有内部边距的容器,方便使用在内部添加如按钮等自定义元素 |
### 页面(外部)
| 名称 | 用途 |
|---------------------|------------------------|
| ItemOuterLargeTitle | 外部大标题附带说明(适用于如椒盐音乐实验室) |
| ItemOuterTextButton | 适用于 Item 的外部文本按钮 |
### 文本
| 名称 | 用途 |
|---------|-------------|
| .textDp | 文本单位使用 dp 值 |
### 按钮
| 名称 | 用途 |
|----------------|------------------|
| BasicButton | 基本按钮 |
| TextButton | 默认文本按钮 |
### 点击
| 名称 | 用途 |
|----------------------------|-----------------|
| Modifier.noRippleClickable | 没有涟漪扩散的点击效果 |
| Modifier.fadeClickable | 减淡点击效果(添加透明度效果) |
### 对话框 Dialog
| 名称 | 用途 |
|-------------------|---------|
| BottomSheetDialog | 默认底部对话框 |
| YesNoDialog | 请求确认对话框 |
## 贡献
[贡献者行为准则](CODE_OF_CONDUCT.md)
## 版权
LGPL-2.1 License,详见 [LICENSE](LICENSE) 。
使用开源库:AndroidX、Kotlin 等。
```
SaltUI
Copyright (C) 2023 Moriafly
This library is free software; you can redistribute it and/or
modify it under the terms of the GNU Lesser General Public
License as published by the Free Software Foundation; either
version 2.1 of the License, or (at your option) any later version.
This library is distributed in the hope that it will be useful,
but WITHOUT ANY WARRANTY; without even the implied warranty of
MERCHANTABILITY or FITNESS FOR A PARTICULAR PURPOSE. See the GNU
Lesser General Public License for more details.
```
## 星星历史
[](https://star-history.com/#Moriafly/SaltUI&Date) | 22 | 0 |
abeisgoat/game.work | https://github.com/abeisgoat/game.work | A Framework Laptop powered retro Game Console! | # Game.work Files
Keep in mind, this project has many rough edges so this build will require some effort.
| 14 | 0 |
psychic-api/rag-stack | https://github.com/psychic-api/rag-stack | 🤖 Deploy a private ChatGPT alternative hosted within your VPC. 🔮 Connect it to your organization's knowledge base and use it as a corporate oracle. Supports open-source LLMs like Llama 2, Falcon, and GPT4All. | # 🧺 RAGstack
Deploy a private ChatGPT alternative hosted within your VPC. Connect it to your organization's knowledge base and use it as a corporate oracle. Supports open-source LLMs like Llama 2, Falcon, and GPT4All.
<p align="center">
<a href="https://discord.gg/vhxm8qMQc">
<img alt="Discord" src="https://img.shields.io/discord/1131844815005429790?label=&logo=discord&logoColor=ffffff&color=7389D8&labelColor=6A7EC2" />
</a>
<a href="https://github.com/psychicapi/rag-stack/issues?q=is%3Aissue+is%3Aclosed" target="_blank">
<img src="https://img.shields.io/github/issues-closed/psychicapi/psychic?color=blue" alt="Issues">
</a>
<a href="https://twitter.com/psychicapi" target="_blank">
<img src="https://img.shields.io/twitter/follow/psychicapi?style=social" alt="Twitter">
</a>
</p>
**Retrieval Augmented Generation (RAG)** is a technique where the capabilities of a large language model (LLM) are augmented by retrieving information from other systems and inserting them into the LLM’s context window via a prompt. This gives LLMs information beyond what was provided in their training data, which is necessary for almost every enterprise use case. Examples include data from current web pages, data from SaaS apps like Confluence or Salesforce, and data from documents like sales contracts and PDFs.
RAG works better than fine-tuning the model because it’s cheaper, it’s faster, and it’s more reliable since the source of information is provided with each response.
RAGstack deploys the following resources for retrieval-augmented generation:
### Open-source LLM
- GPT4All: When you run locally, RAGstack will download and deploy Nomic AI's [gpt4all](https://github.com/nomic-ai/gpt4all) model, which runs on consumer CPUs.
- Falcon-7b: On the cloud, RAGstack deploys Technology Innovation Institute's [falcon-7b](https://huggingface.co./tiiuae/falcon-7b) model onto a GPU-enabled GKE cluster.
- LLama 2: On the cloud, RAGstack can also deploy the 7B paramter version of Meta's [Llama 2](https://ai.meta.com/llama/) model onto a GPU-enabled GKE cluster.
### Vector database
- [Qdrant](https://github.com/qdrant/qdrant): Qdrant is an open-source vector database written in Rust, so it's highly performant and self-hostable.
### Server + UI
Simple server and UI that handles PDF upload, so that you can chat over your PDFs using Qdrant and the open-source LLM of choice.
<img width="800" alt="Screenshot 2023-08-02 at 9 22 27 PM" src="https://github.com/psychic-api/rag-stack/assets/14931371/385f07d0-765f-4afd-b2da-88c3126184b7">
## Run locally
1. Copy `ragstack-ui/local.env` into `ragstack-ui/.env`
2. Copy `server/example.env` into `server/.env`
3. In `server/.env` replace `YOUR_SUPABASE_URL` with your supabase project url and `YOUR_SUPABASE_KEY` with your supabase secret API key. In `ragstack-ui/.env` replace `YOUR_SUPABASE_URL` with your supabase project url and `YOUR_SUPABASE_PUBLIC_KEY` with your supabase secret API key. You can find these values in your supabase dashboard under [Settings > API](https://supabase.com/docs/guides/api/api-keys)
4. In Supabase, create a table `ragstack_users` with the following columns:
| Column name | Type |
| ----------- | ---- |
| id | uuid |
| app_id | uuid |
| secret_key | uuid |
| email | text |
| avatar_url | text |
| full_name | text |
If you added row level security, make sure that inserts and selects have a `WITH CHECK` expression of `(auth.uid() = id)`.
5. Run `scripts/local/run-dev`. This will download [ggml-gpt4all-j-v1.3-groovy.bin](https://gpt4all.io/models/ggml-gpt4all-j-v1.3-groovy.bin) into `server/llm/local/` and run the server, LLM, and Qdrant vector database locally.
All services will be ready once you see the following message:
```
INFO: Application startup complete.
```
## Deploy to Google Cloud
To deploy the RAG stack using `Falcon-7B` running on GPUs to your own google cloud instance, go through the following steps:
1. Run `scripts/gcp/deploy-gcp.sh`. This will prompt you for your GCP project ID, service account key file, and region as well as some other parameters (model, HuggingFace token etc).
2. If you get an error on the `Falcon-7B` deployment step, run the following commands and then run `scripts/gcp/deploy-gcp.sh` again:
```
gcloud config set compute/zone YOUR-REGION-HERE
gcloud container clusters get-credentials gpu-cluster
kubectl apply -f https://raw.githubusercontent.com/GoogleCloudPlatform/container-engine-accelerators/master/nvidia-driver-installer/cos/daemonset-preloaded.yaml
```
The deployment script was implemented using Terraform.
3. You can run the frontend by creating a `.env` file in `ragstack-ui` and setting `VITE_SERVER_URL` to the url of the `ragstack-server` instance in your Google Cloud run.
## Deploy to AWS
To deploy the RAG stack using `Falcon-7B` running on GPUs to your own AWS EC2 instances (using ECS), go through the following steps:
1. Run `scripts/aws/deploy-aws.sh`. This will prompt you for your AWS credentials as well as some other parameters (model, HuggingFace token etc).
The deployment script was implemented using Terraform.
3. You can run the frontend by creating a `.env` file in `ragstack-ui` and setting `VITE_SERVER_URL` to the url of the ALB instance.
## Deploy to Azure
To deploy the RAG stack using `Falcon-7B` running on GPUs to your own AKS, go through the following steps:
1. Run `./azure/deploy-aks.sh`. This will prompt you for your AKS subscription as well as some other parameters (model, HuggingFace token etc).
The deployment script was implemented using Terraform.
1. You can run the frontend by creating a `.env` file in `ragstack-ui` and setting `VITE_SERVER_URL` to the url of the `ragstack-server` service in your AKS.
_Please note that this AKS deployment is using node pool with NVIDIA Tesla T4 Accelerator which is not in all subscriptions available_
## Roadmap
- ✅ GPT4all support
- ✅ Falcon-7b support
- ✅ Deployment on GCP
- ✅ Deployment on AWS
- ✅ Deployment on Azure
- 🚧 Llama-2-40b support
## Credits
The code for containerizing Falcon 7B is from Het Trivedi's [tutorial repo](https://github.com/htrivedi99/falcon-7b-truss). Check out his Medium article on how to dockerize Falcon [here](https://towardsdatascience.com/deploying-falcon-7b-into-production-6dd28bb79373)!
| 920 | 63 |
automorphic-ai/trex | https://github.com/automorphic-ai/trex | Intelligently transform unstructured to structured data | <h1 align="center">Trex</h1>
<h2 align="center"><em>T</em>ransformer <em>R</em>egular <em>EX</em>pressions</h2>
<!--- <p align="center"><img src="https://media.discordapp.net/attachments/1107132978859085824/1128974288381288523/Screenshot_2023-07-13_050009-transformed.png" width="25%"/></p> -->
<p align="center"><img src="https://s11.gifyu.com/images/Sczlg.gif" width="50%"/></p>
<p align="center"><em>Our beautiful trex mascot generated by stable diffusion</em></p>
### _Transform unstructured to structured data_
Trex transforms your unstructured to structured data—just specify a regex or context free grammar and we'll intelligently restructure your data so it conforms to that schema.
## Installation
To experiment with Trex, check out the [playground](https://automorphic.ai/playground).
To install the Python client:
```bash
pip install git+https://github.com/automorphic-ai/trex.git
```
If you'd like to self-host this in your own cloud / with your own model, [email us](mailto:[email protected]).
## Usage
To use Trex, you'll need an API key, which you can get by signing up for a free account at [automorphic.ai](https://automorphic.ai).
```python
import trex
tx = trex.Trex('<YOUR_AUTOMORPHIC_API_KEY>')
prompt = '''generate a valid json object of the following format:
{
"name": "string",
"age": "number",
"height": "number",
"pets": pet[]
}
in the above object, name is a string corresponding to the name of the person, age is a number corresponding to the age of the person in inches as an integer, height is a number corresponding to the height of the person, and pets is an array of pets.
where pet is defined as:
{
"name": "string",
"species": "string",
"cost": "number",
"dob": "string"
}
in the above object name is a string corresponding to the name of the pet, species is a string corresponding to the species of the pet, cost is a number corresponding to the cost of the pet, and dob is a string corresponding to the date of birth of the pet.
given the above, generate a valid json object containing the following data: one human named dave 30 years old 5 foot 8 with a single dog pet named 'trex'. the dog costed $100 and was born on 9/11/2001.
'''
custom_grammar = r"""
?start: json_schema
json_schema: "{" name "," age "," height "," pets "}"
name: "\"name\"" ":" ESCAPED_STRING
age: "\"age\"" ":" NUMBER
height: "\"height\"" ":" NUMBER
pets: "\"pets\"" ":" "[" [pet ("," pet)*] "]"
pet: "{" pet_name "," species "," cost "," dob "}"
pet_name: "\"name\"" ":" ESCAPED_STRING
species: "\"species\"" ":" ESCAPED_STRING
cost: "\"cost\"" ":" NUMBER
dob: "\"dob\"" ":" ESCAPED_STRING
%import common.ESCAPED_STRING
%import common.NUMBER
%import common.WS
%ignore WS
"""
print(tx.generate_cfg(prompt, cfg=custom_grammar, language='json').response)
# the above produces:
# {
# "name": "dave",
# "age": 30,
# "height": 58,
# "pets": [
# {
# "name": "trex",
# "species": "dog",
# "cost": 100,
# "dob": "2001-09-11"
# }
# ]
# }
```
## Roadmap
- [x] Structured JSON generation
- [x] Structured custom CFG generation
- [x] Structured custom regex generation
- [ ] SIGNIFICANT speed improvements (in progress)
- [ ] Auto-prompt generation for unstructured ETL
- [ ] More intelligent models
Join our [Discord](https://discord.gg/E8y4NcNeBe) or [email us](mailto:[email protected]), if you're interested in or need help using Trex, have ideas, or want to contribute.
Follow us on [Twitter](https://twitter.com/AutomorphicAI) for updates.
| 141 | 5 |
MrHacker-X/OsintifyX | https://github.com/MrHacker-X/OsintifyX | OsintifyX: Powerful Open-source OSINT tool for extracting valuable information from Instagram profiles. | <h1 align="center">OsintifyX</h1>
<p align="center">
<img src="https://img.shields.io/github/stars/MrHacker-X/OsintifyX?style=for-the-badge&color=orange">
<img src="https://img.shields.io/github/forks/MrHacker-X/OsintifyX?color=cyan&style=for-the-badge&color=purple">
<img src="https://img.shields.io/github/watchers/MrHacker-X/OsintifyX?color=cyan&style=for-the-badge&color=purple">
<img src="https://img.shields.io/github/issues/MrHacker-X/OsintifyX?color=red&style=for-the-badge">
<img src="https://img.shields.io/github/license/MrHacker-X/OsintifyX?style=for-the-badge&color=blue"><br>
<img src="https://hits.dwyl.com/MrHacker-X/OsintifyX.svg" width="140" height="28">
<br>
<br>
<img src="https://img.shields.io/badge/Author-Alex Butler-purple?style=flat-square">
<img src="https://img.shields.io/badge/Open%20Source-Yes-cyan?style=flat-square">
<img src="https://img.shields.io/badge/Written%20In-Python-blue?style=flat-square">
</p>
+ OsintifyX is a powerful open-source OSINT (Open-Source Intelligence) tool designed for extracting valuable information from Instagram profiles. This tool can be easily used on various operating systems, including Termux, Linux, and any other OS with Python installed.
## Features
+ OsintifyX offers a wide range of features to gather comprehensive information about a target Instagram profile. The following features are currently available:
```
[01] Info: Retrieve detailed information about the target profile.
[02] Hashtag: Get all the hashtags used in the target's posts.
[03] Follows: Obtain a list of accounts followed by the target.
[04] Followings: Obtain a list of accounts followed by the target.
[05] Tagged: Retrieve a list of users tagged by the target.
[06] Post: Get complete details of a target's post.
[07] Caption: Retrieve the caption of a target's post.
[08] Location: Get the mentioned location of a target's post.
[09] Stories: Obtain the stories posted by the target.
[10] ProPic: Download the profile picture of the target.
[11] Images: Retrieve all images from a target's post.
[12] Comment User: Get a list of users who commented on a target's post.
[13] Comments: Retrieve all the comments on a target's post.
[14] Liked Users: Get a list of users who liked a target's post.
[15] Biography: Obtain the biography of the target user.
[16] Media Type: Retrieve the type of media (photo, video, carousel) posted by the target.
```
## Usages
+ To use OsintifyX, follow these steps:
+ ` apt-get update -y `
+ ` apt-get upgrade -y `
+ ` apt-get install git python python-pip -y ` [For Termux]
+ ` apt-get install git python3 python3-pip -y ` [For Linux]
+ ` pip install instaloader `
+ ` pip install tabulate `
+ ` git clone https://github.com/MrHacker-X/osintifyX.git `
+ ` cd OsintifyX `
+ ` nano credx.py `
> Now put your fake instagram id, password in that file. and save it by ` ctrl + s ` and exit the file by ` ctrl + x `
+ ` python osintifyx.py `
+ Please note that you may need to have Python installed on your system for the tool to run successfully.
## Main menu

## Note
+ This is not complete version
## Terms & Conditions
+ Before you use this tool, read [Terms and Conditions](https://github.com/MrHacker-X/OsintifyX/blob/main/TERMS.md) first.
## Disclaimer
+ This version is Not complete version so it can fail somtimes. Also this tool is made for educational and research purposes only, i do not assume any kind of responsibility for any imprope use of this tool.
## Contribution
+ Contributions to OsintifyX are always welcome! If you find any issues or have suggestions for improvement, please open an issue on the GitHub repository. Feel free to fork the project and submit pull requests as well.
## Donation
███ BTC, USDT, LTC, ETH ███ (BEP20)
```
0xe64f7b01f4f7246e59b9a8e71f4ee7bbc78dcff9
```
<h3><b><i>📡 Connect with us :</i></b></h3>
[](https://telegram.me/hackwithalex)
<br>
[](https://www.youtube.com/@Technolex)
<br>
[](https://www.instagram.com/haxorlex)
<br>
[](https://github.com/MrHacker-X)
| 13 | 1 |
apple/ml-upscale | https://github.com/apple/ml-upscale | Export utility for unconstrained channel pruned models | # Unconstrained Channel Pruning · [Paper](https://openreview.net/forum?id=25fe54GXLo)
[](https://colab.research.google.com/drive/1vTZBWB3O2oj-g8oH5sj7j4CJ_xe6mv1p?usp=sharing)
**UPSCALE: Unconstrained Channel Pruning** @ [ICML 2023](https://openreview.net/forum?id=25fe54GXLo)<br/>
[Alvin Wan](https://alvinwan.com), [Hanxiang Hao](https://scholar.google.com/citations?user=IMn1m2sAAAAJ&hl=en&oi=ao), [Kaushik Patnaik](https://openreview.net/profile?id=~Kaushik_Patnaik1), [Yueyang Xu](https://github.com/inSam), [Omer Hadad](https://scholar.google.com/citations?user=cHZBEjQAAAAJ&hl=en), [David Güera](https://davidguera.com), [Zhile Ren](https://jrenzhile.com), [Qi Shan](https://scholar.google.com/citations?user=0FbnKXwAAAAJ&hl=en)
By removing constraints from existing pruners, we improve ImageNet accuracy for post-training pruned models by 2.1 points on average - benefiting DenseNet (+16.9), EfficientNetV2 (+7.9), and ResNet (+6.2). Furthermore, for these unconstrained pruned models, UPSCALE improves inference speeds by up to 2x over a baseline export.
## Quick Start
Install our package.
```bash
pip install apple-upscale
```
Mask and prune channels, using the default magnitude pruner.
```python
import torch, torchvision
from upscale import MaskingManager, PruningManager
x = torch.rand((1, 3, 224, 224), device='cuda')
model = torchvision.models.get_model('resnet18', pretrained=True).cuda() # get any pytorch model
MaskingManager(model).importance().mask()
PruningManager(model).compute([x]).prune()
```
## Customize Pruning
We provide a number of pruning heuristics out of the box:
- Magnitude ([L1](https://arxiv.org/abs/1608.08710) and [L2](https://arxiv.org/abs/1608.03665))
- [LAMP](https://arxiv.org/abs/2010.07611)
- [FPGM](https://arxiv.org/abs/1811.00250)
- [HRank](https://arxiv.org/abs/2002.10179)
You can pass the desired heuristic into the `UpscaleManager.mask` method call. You can also configure the pruning ratio in `UpscaleManager.mask`. A value of `0.25` means 25% of channels are set to zero.
```python
from upscale.importance import LAMP
MaskingManager(model).importance(LAMP()).mask(amount=0.25)
```
You can also zero out channels using any method you see fit.
```python
model.conv0.weight[:, 24] = 0
```
Then, run our export.
```python
PruningManager(model).compute([x]).prune()
```
## Advanced
You may want direct access to network segments to build a heavily-customized pruning algorithm.
```python
for segment in MaskingManager(model).segments():
# prune each segment in the network independently
for layer in segment.layers:
# layers in the segment
```
## Development
> **NOTE:** See [src/upscale/pruning/README.md](src/upscale/pruning/README.md) for more details on how the core export algorithm code is organized.
Clone and setup.
```bash
git clone [email protected]:apple/ml-upscale.git
cd upscale
pip install -e .
```
Run tests.
```
py.test src tests --doctest-modules
```
## Paper
Follow the development installation instructions to have the paper code under `paper/` available.
To run the baseline unconstrained export, pass `baseline=True` to `PruningManager.prune`.
```python
PruningManager(model).compute([x]).prune(baseline=True)
```
To reproduce the paper results, run
```bash
python paper/main.py resnet18
```
Plug in any model in the `torchvision.models` namespace.
```
usage: main.py [-h] [--side {input,output} [{input,output} ...]]
[--method {constrained,unconstrained} [{constrained,unconstrained} ...]]
[--amount AMOUNT [AMOUNT ...]] [--epochs EPOCHS]
[--heuristic {l1,l2,lamp,fpgm,hrank}] [--global] [--out OUT]
[--force] [--latency] [--clean]
model
positional arguments:
model model to prune
options:
-h, --help show this help message and exit
--side {input,output} [{input,output} ...]
prune which "side" -- producers, or consumers
--method {constrained,unconstrained} [{constrained,unconstrained} ...]
how to handle multiple branches
--amount AMOUNT [AMOUNT ...]
amounts to prune by. .6 means 60 percent pruned
--epochs EPOCHS number of epochs to train for
--heuristic {l1,l2,lamp,fpgm,hrank}
pruning heuristic
--global apply heuristic globally
--out OUT directory to write results.csv to
--force force latency rerun
--latency measure latency locally
--clean clean the dataframe
```
## Citation
If you find this useful for your research, please consider citing
```
@inproceedings{wan2023upscale,
title={UPSCALE: Unconstrained Channel Pruning},
author={Alvin Wan and Hanxiang Hao and Kaushik Patnaik and Yueyang Xu and Omer Hadad and David Guera and Zhile Ren and Qi Shan},
booktitle={ICML},
year={2023}
}
```
| 47 | 6 |
Sigil-Wen/Dream-with-Vision-Pro | https://github.com/Sigil-Wen/Dream-with-Vision-Pro | Text to 3D generation in Apple Vision Pro built with the VisionOS SDK. 3D Scribblenauts in AR for the Scale Generative AI Hackathon. Won Scale AI Prize | 
# Dream with Vision Pro
[](https://discord.gg/C6ukDBEbFY)
Welcome to Dream with Vision Pro, a lucid text-to-3D tool built with the Apple VisionOS SDK. Powered by Scale AI's Spellbook, OpenAI's GPT-4 and Shap-E, Modal, Replicate, and the Meta Quest 2, we empower you to transform your imagination into stunning immersive experiences.

## Enter Your Vision:
Type in the text description of the object you envision. This could be anything from an elephant to a sword. Unleash your imagination. Once you've described it, your object will appear before you.
## Demo

Using Scale AI's Spellbound to infer the size of the objects to render accurately.

## How it Works
Here's a step-by-step breakdown of what Dream with Vision Pro does:
First, the user specifies the object they want to visualize. This input triggers the [Shap-E](https://github.com/openai/shap-e) model via [Modal](https://mcantillon21--dream-fastapi-app.modal.run/) and [Replicate](https://replicate.com/), producing a .obj file - a standard 3D model format.
Next, we employ [Spellbook](https://dashboard.scale.com/spellbook/api/v2/deploy/9f33d7g) and GPT-4 to estimate the object's height, ensuring the 3D representation is accurately scaled.
The final phase employs [3D Viewer](https://3dviewer.net) to convert your .obj file into a realistic 3D model that you can interact with. This 3D model can be directly accessed from Apple's VisionOS, which we stream directly to your Meta Quest 2, offering a fully immersive experience of your original concept.
## Spellbook Prompts
### System:
```
As an AI system, you are extremely skilled at extracting objects and estimating their realistic height in meters from a given text prompt. Your task is to identify the object(s) mentioned in the prompt and their estimated height in meters. Once identified, the information must be formatted according to the provided format for a text-to-3D model application.
```
### User:
```
Could you extract the object and realistic object height in meters from the following text prompts?
Begin:
Input: a red apple
Output: 0.075
Input: a large elephant
Output: 3.000
Input: {{ input }}
Output:
```
## Next Steps
We've started to integrate OpenAI's Whisper model, expanding our capability beyond text-to-3D transformations. Users will be able to engage in a more intuitive way, interacting with their 3D creations through the power of voice.
Once we have the .obj file, we are working on using [USZD Tools](https://developer.apple.com/augmented-reality/tools/) which lets us convert to the .usdz format - a requisite for VisionOS. Following this conversion, we can seamlessly render the objects.
## Acknowledgements
We thank the Scale AI Spellbook team for the credits and ease of use, Ben Firshman of Replicate for the dedicated A100 GPU we run Shap-E on, Erik Bernhardsson of Modal for dedicated Whisper and hosted endpoints, and especially Mehran Jalali for letting us borrow the Meta Quest 2 for testing.
| 64 | 8 |
coolbeevip/langchain_plantuml | https://github.com/coolbeevip/langchain_plantuml | null | # Visualization UML diagram tool for LangChain workflows
[](https://opensource.org/licenses/Apache-2.0)
[](https://pypi.org/project/langchain-plantuml/)
[](https://github.com/coolbeevip/langchain_plantuml/actions/workflows/lint.yml)
[](https://github.com/coolbeevip/langchain_plantuml/actions)
[](https://github.com/psf/black)
[](https://pypi.org/project/langchain-plantuml/)
Subscribe to events using a callback and store them in PlantUML format to easily visualize LangChain workflow in Activity Diagram and Sequence Diagram.
You can easily subscribe to events and keep them in a form that is easy to visualize and analyze using PlantUML.
Activity Diagram

Sequence Diagram

## Quick Start
Install this library:
```shell
pip install langchain-plantuml
```
Then:
1. Add import langchain_plantuml as the first import in your Python entrypoint file
2. Create a callback using the activity_diagram_callback function
3. Hook into your LLM application
4. Call the export_uml_content method of activity_diagram_callback to export the PlantUML content
5. Save PlantUML content to a file
6. Exporting PlantUML to PNG
Running the minimal activity diagram example.
```python
from langchain import OpenAI, LLMChain, PromptTemplate
from langchain.memory import ConversationBufferMemory
from langchain_plantuml import plantuml
template = """You are a chatbot having a conversation with a human.
{chat_history}
Human: {human_input}
Chatbot:"""
prompt = PromptTemplate(
input_variables=["chat_history", "human_input"], template=template
)
memory = ConversationBufferMemory(memory_key="chat_history")
callback_handler = plantuml.activity_diagram_callback()
llm_chain = LLMChain(
llm=OpenAI(),
prompt=prompt,
verbose=True,
memory=memory,
callbacks=[callback_handler]
)
llm_chain.predict(human_input="Hi there my friend")
llm_chain.predict(human_input="Not too bad - how are you?")
callback_handler.save_uml_content("example-activity.puml")
```
You will get the following PlantUML activity diagram

Sequence Diagram
```python
callback_handler = diagram.sequence_diagram_callback()
```
Custom note max Length(default 1000)
```python
callback_handler = diagram.activity_diagram_callback(note_max_length=2000)
```
Custom note wrap width(default 500)
```python
callback_handler = diagram.activity_diagram_callback(note_wrap_width=500)
```
## Exporting PlantUML to PNG
You can download [plantuml.1.2023.10.jar](https://github.com/plantuml/plantuml/releases/download/v1.2023.10/plantuml-1.2023.10.jar)
```shell
java -DPLANTUML_LIMIT_SIZE=81920 -jar plantuml-1.2023.10.jar example-activity.puml
```
| 43 | 4 |
deaaprizal/reactjs-konversi-suhu | https://github.com/deaaprizal/reactjs-konversi-suhu | React JS + Vite Konversi Suhu Base Template (with custom hooks) untuk tutorial docker di youtube deaafrizal | # reactjs-konversi-suhu
### catatan:
1. ganti nama file <code>.env.example</code> menjadi <code>.env</code> saja (tanpa .example)
2. link video tutorial docker untuk template project ini: <code>https://youtu.be/C0ZXEvdZGME</code>
| 11 | 0 |
lumi518/twinhub-frontend | https://github.com/lumi518/twinhub-frontend | Enjoy chatting with the most engaging AI influencers! | 19 | 1 |
End of preview. Expand
in Dataset Viewer.
- Downloads last month
- 35